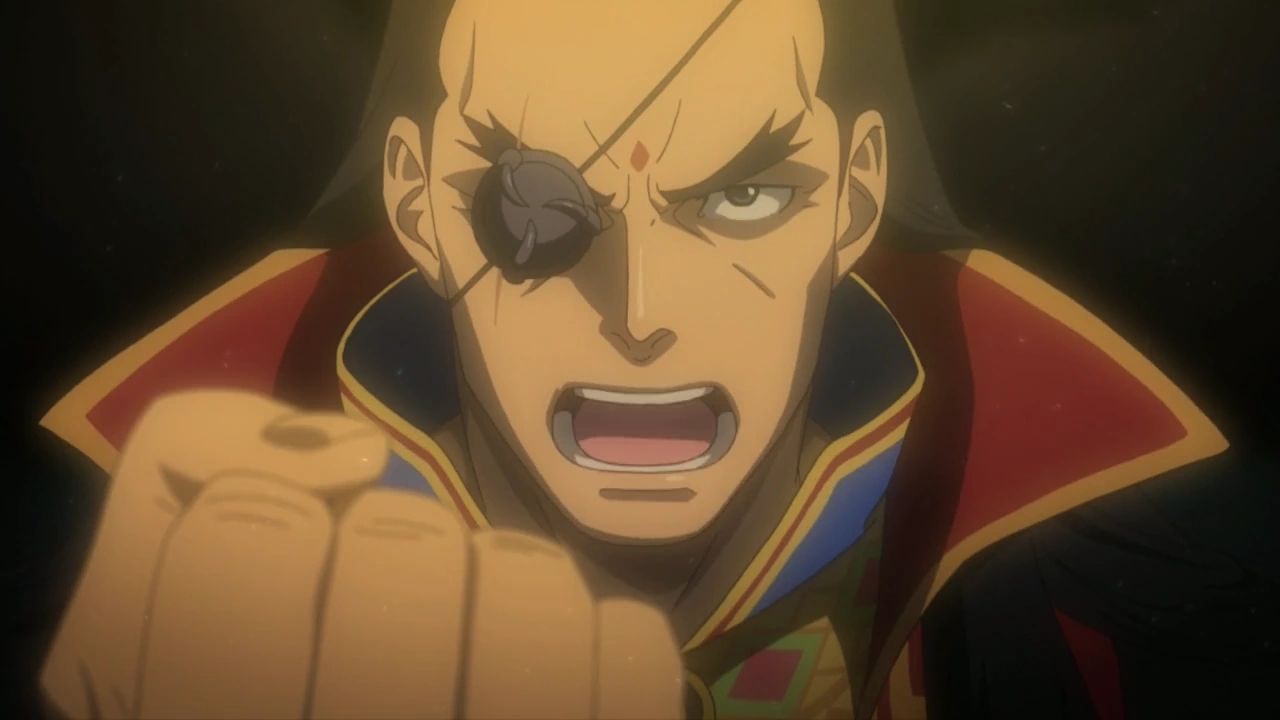
| Dhurke Sahdmadhi |
| Don't you ever stop. You just keep on walking... comrade. Stay brave, because there will be days when you'll want to stop, but I have faith you'll find a way to muster the strength to push through them. |
Episode 5: Turnabout Revolution is the fifth and final episode of the main story of Phoenix Wright: Ace Attorney: Spirit of Justice. It is a two-part finale that follows Apollo Justice as he fights to resolve two cases with even higher stakes than his previous trial. In the first case, a dispute over the artifact known as the Founder's Orb leads to him and Athena Cykes facing Phoenix Wright on opposite sides of an American courtroom in a civil trial. The second case takes place in Khura'in, where Dhurke Sahdmadhi, the leader of the Defiant Dragons, is caught and tried for the murder of Minister Inga Karkhuul Khura'in. As the fate of the Khura'inese revolution against the Defense Culpability Act hangs in the balance, Apollo Justice faces his greatest challenge as he confronts not only his past, but the ruling monarch of Khura'in herself.
May 16
A broadcast of The Plumed Punisher: Warrior of Neo Twilight Realm was hijacked by the Defiant Dragons. The broadcast now showed Dhurke with Datz Are'bal by his side. The infamous rebel leader relayed his message:
| Dhurke Sahdmadhi |
| Good people of Khura'in, we can't allow things to go on like this. The Defense Culpability Act has done nothing but produce countless victims of wrongful convictions. The time to act is now. For we, the Defiant Dragons, have obtained the ultimate weapon: the Founder's Orb! And to the Ga'ran regime: Make no mistake about it — I will personally dethrone you! A dragon never yields. Nor will he rest until his revolution is complete. |
Dhurke vowing to dethrone Queen Ga'ran.
Coverage of the incident soon appeared on American morning news at 11. Apollo Justice wondered out loud what Dhurke was planning, piquing Trucy Wright's curiosity. He admitted that they knew each other from a long time ago, but before he could elaborate any further, the man himself showed up at the Wright Anything Agency and enthusiastically greeted the two. Dhurke was shocked to learn that Apollo had never mentioned his past to anyone. Apollo initially tried to leave, then asked Dhurke why he had shown up after so much time had passed. Dhurke replied that, though he wanted a favor from him, his primary reason was simply to see his son again.
Dhurke introduced himself to Trucy, explaining to her that he was Apollo's foster father and Nahyuta Sahdmadhi's biological father. Apollo explained that he had grown up in Khura'in, and that he had never told anyone about it because of how unbelievable his relationship with such a controversial figure as Dhurke would seem to others. Apollo said that he had assumed that Dhurke had forgotten about him, but Dhurke flatly denied it, explaining that he had been unable to visit before due his work with the Defiant Dragons, and his fugitive status. This merely left Apollo wondering why Dhurke would suddenly show up and start acting like a parent after all this time.
Dhurke revealed that he had lied about possessing the Founder's Orb, and that the claim that the Defiant Dragons had stolen it from Tehm'pul Temple was also a lie. However, Are'bal had tracked the orb to Kurain Village, discovering it in the possession of Archie Buff, an archaeologist who had taken up residence there. According to Are'bal, someone, presumably the thief who had stolen the orb in the first place, had asked Dr. Buff to study the artifact, but the latter had nevertheless agreed to hand over the orb to the Defiant Dragons. Dhurke wanted Apollo to be present as his lawyer when he took possession of the orb, to which Apollo agreed. Dhurke further explained that the orb had been found during an excavation eight years ago, and that according to legend, whoever solved a riddle associated it would be granted immense spiritual power. If the Defiant Dragons obtained such power, it would grant them the right to rule Khura'in, or so Dhurke believed.

Jove Justice, Apollo's father.
Dhurke offered Apollo and Trucy a plate of sushi, unsure of whether his son could afford three square meals a day, but Justice declined, leaving Dhurke and Trucy to eat it themselves. Dhurke also showed a photo of Jove Justice, Apollo's biological father, who had died 23 years ago, thinking it sad that Apollo didn't know what his father looked like. Apollo was unmoved by the gift, having never known Jove as a person, but Dhurke nevertheless insisted that he keep hold of the photo, saying that it had taken him a lot of effort to obtain it.
Before the trio left for Kurain Village, Apollo learned from Trucy that Athena Cykes had left to pick up Phoenix Wright from the airport. She briefly pondered why Phoenix had cut his trip short, and why he and Cykes hadn't returned to the agency. Throughout the bus ride to the village and their initial arrival there, Apollo and Dhurke reminisced about their life with Nahyuta. The mountains near the village also reminded them of the mountains of Khura'in where they had lived. To Apollo's surprise, they encountered Ema Skye at the village. Apollo guessed that she was investigating a case, and Skye in turn guessed that they had come to see Dr. Buff, before offering to take them to him.
"The Doctor's Study"

The photo of the alleged accident.
Skye led the three to Dr. Buff's residence, specifically his study, which contained ceiling-high bookshelves and numerous artifacts. A large pile of books had spilled onto the floor, with a chalk body outline underneath. Skye told Apollo the police theory Dr. Buff had tried to retrieve a book from one of the topmost bookshelves using a ladder, but he had somehow triggered an avalanche of falling books, causing him to fall off the ladder onto the floor and sustain a fatal head injury. This theory was due to an anonymous call that Skye had received the next morning, claiming to have discovered the body. Fortunately for Dhurke, Are'bal had obtained a written agreement to transfer possession of the Founder's Orb. Regardless, he would still have to look for the orb. Skye gave them permission to search the scene, in exchange for their help with her investigation.
Skye provided the police photo of the scene, in which Apollo noticed a book stained with blood and coffee. Meanwhile, Dhurke took notice of the large window next to the bookshelves, which Skye explained was how the anonymous caller had discovered the body. Near the back entrance hung a green and yellow raincoat that was damp, indicating recent use. The group had reached the study through a different entrance via a spiral staircase, which continued into an upper floor. Apollo examined Dr. Buff's desk and learned that he had reading glasses and a password-protected computer.
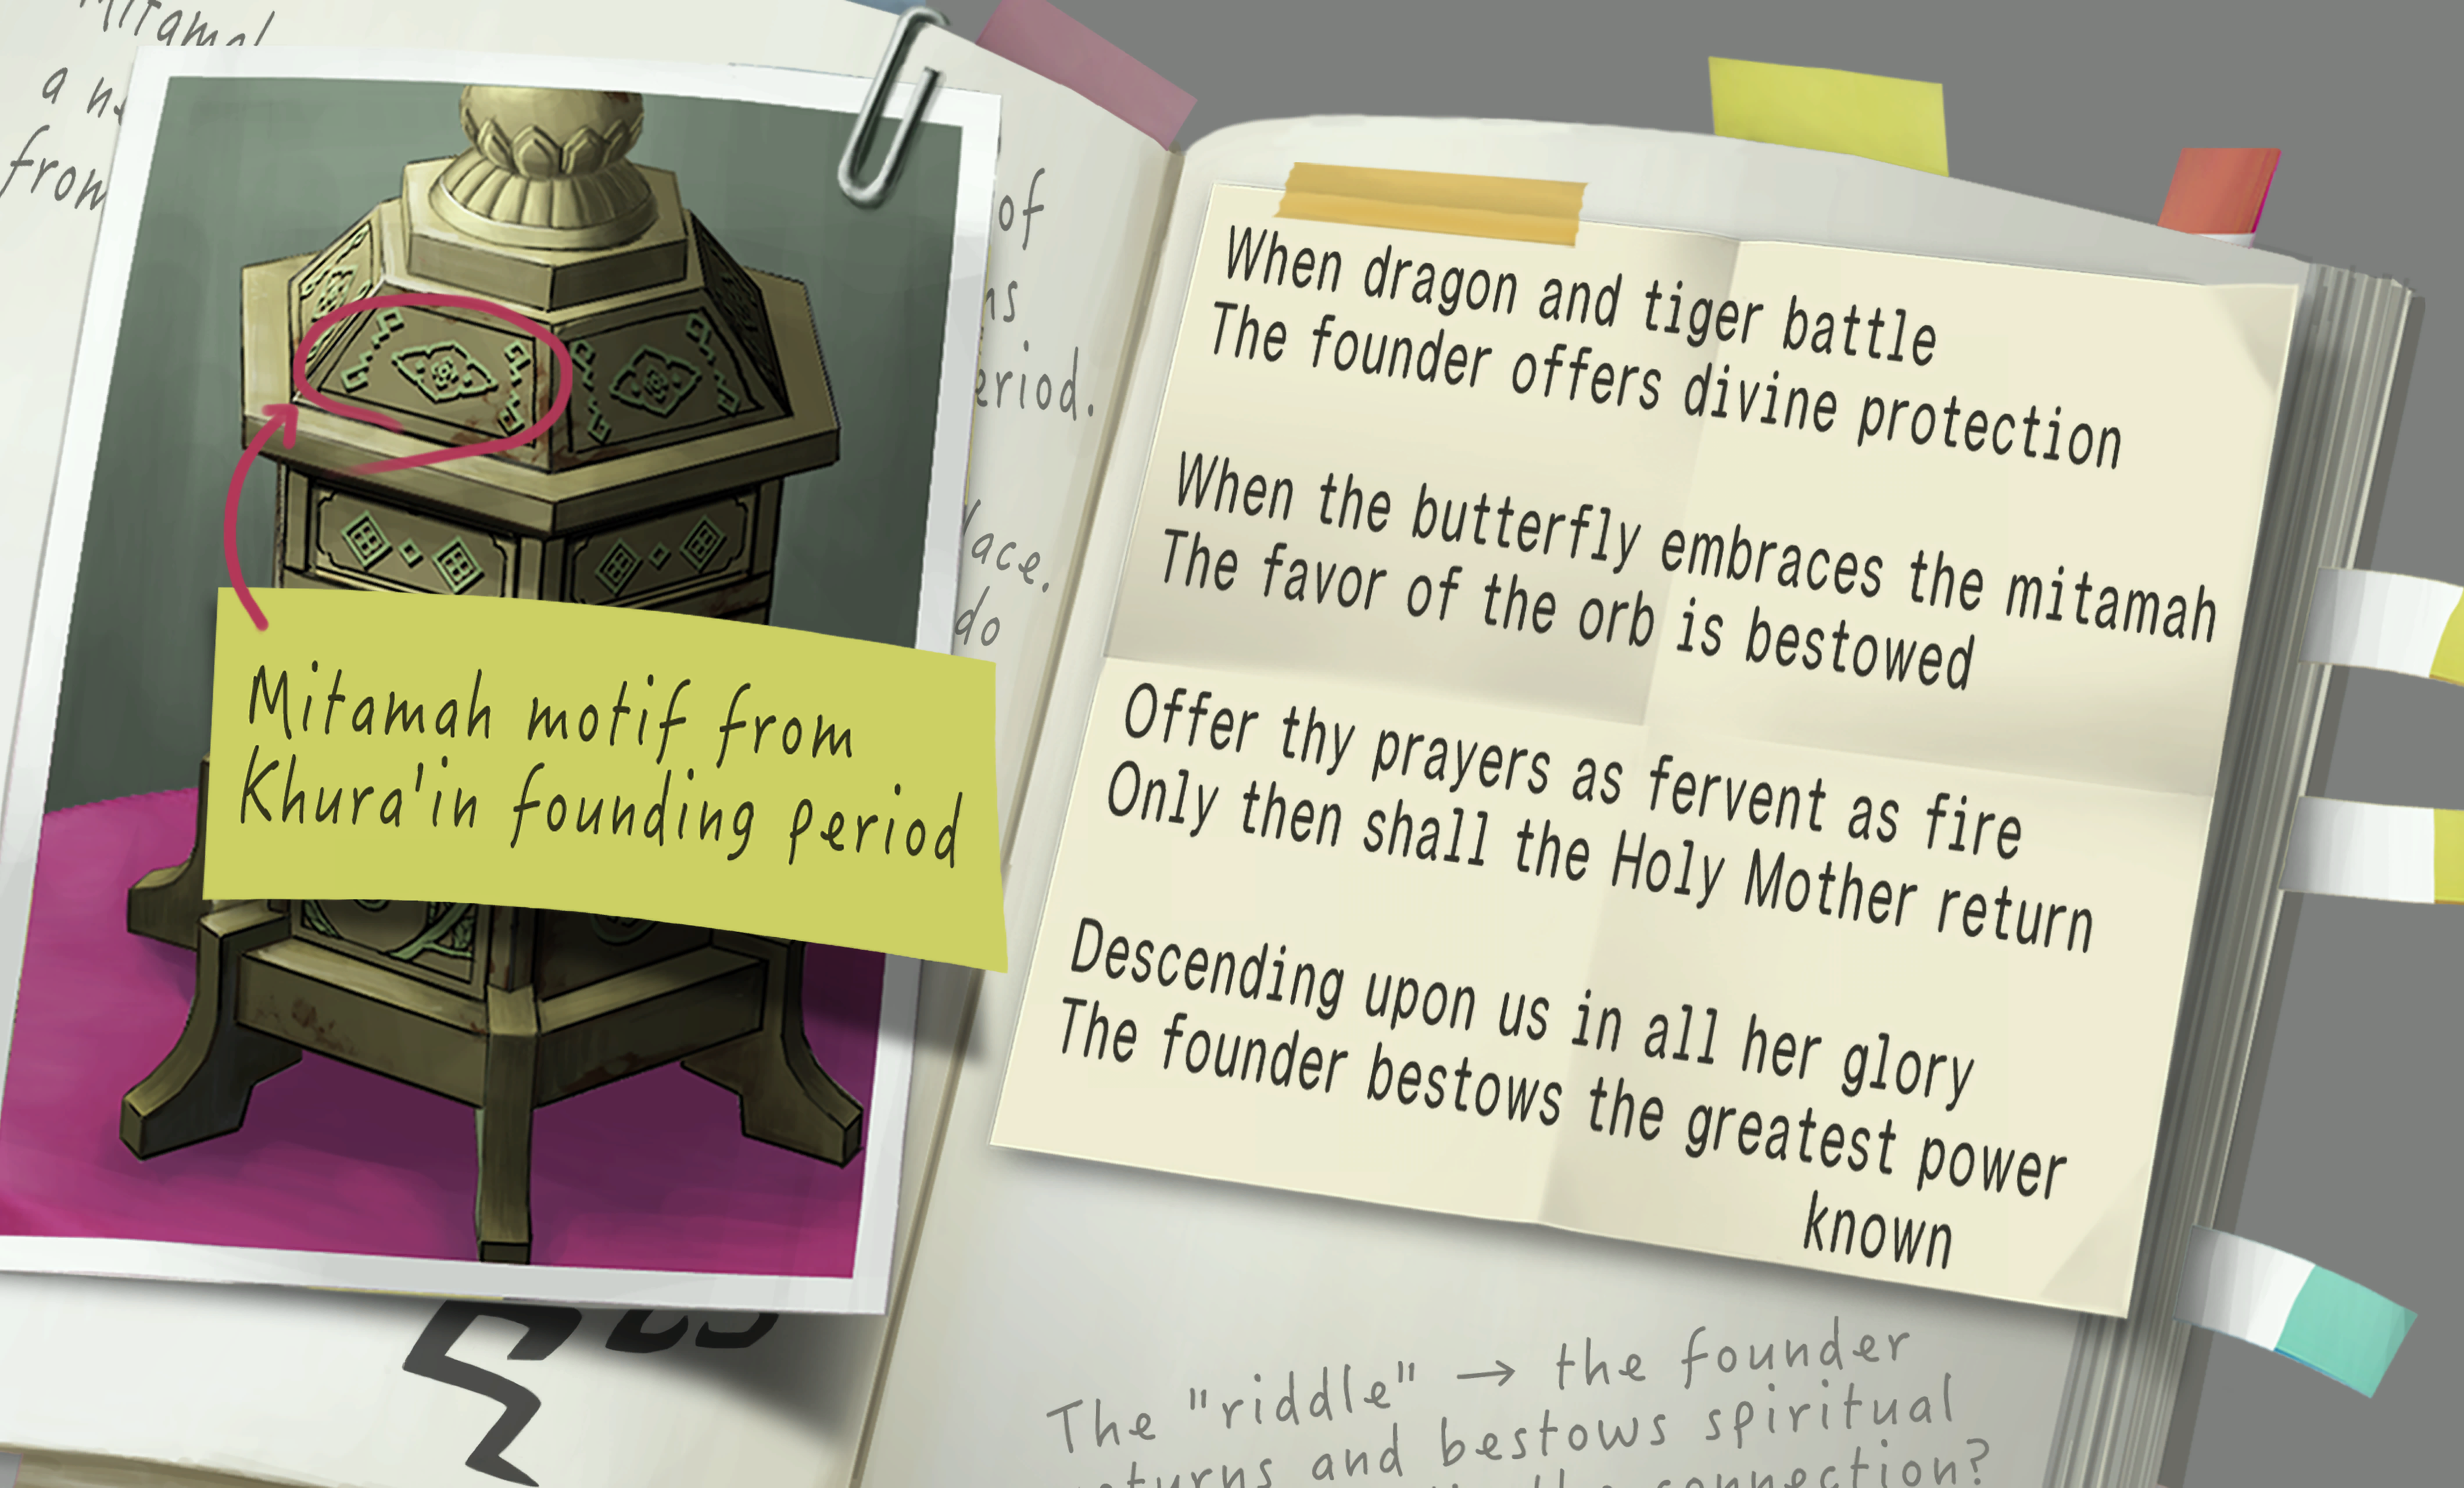
The group also found Dr. Buff's research notes on the Founder's Orb lying on the floor next to a coffee bar, which included both a photo of Tehm'pul Temple's treasure box and the lyrics of the Song of Ceremony. Dhurke mentioned that the solution to the orb's riddle was supposedly hidden within the lyrics of the song, and found it unusual that the second half of the song was included, since only the first half was sung during the Dance of Devotion. Exploring further, the group discovered a locked suitcase that had been left in the study the previous night, which was revealed to belong to Are'bal after the group tested the suitcase for fingerprints. Skye told them that there had been reports of him loitering in the village.
"The Treasure Hunt Begins"


The Paul Atishon.
Having failed to find the Founder's Orb, Apollo, Dhurke and Trucy returned to the village to look for Are'bal, and immediately encountered a palanquin carrying Paul Atishon, the grandson of a renowned politician, who was campaigning for a seat on the local council. Atishon demanded to know why they were in Dr. Buff's house, and Apollo told him about the orb that Dr. Buff had been studying. Atishon claimed that the orb was the Crystal of Ami Fey, an Atishon family heirloom that had been stolen and hidden away by the archaeologist. Apollo argued that Dr. Buff had referred to the object as the Founder's Orb, but Atishon retorted that he had been tricked into doing so by Are'bal, who had recently been taken into police custody after being caught hiding in Atishon's dog's doghouse. Atishon revealed that he planned to give the orb to an influential benefactor of his, who would in turn support him during his political career.
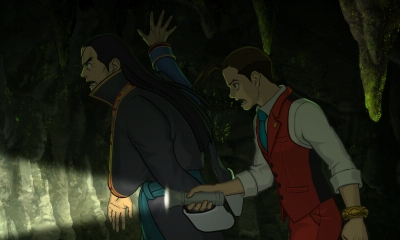
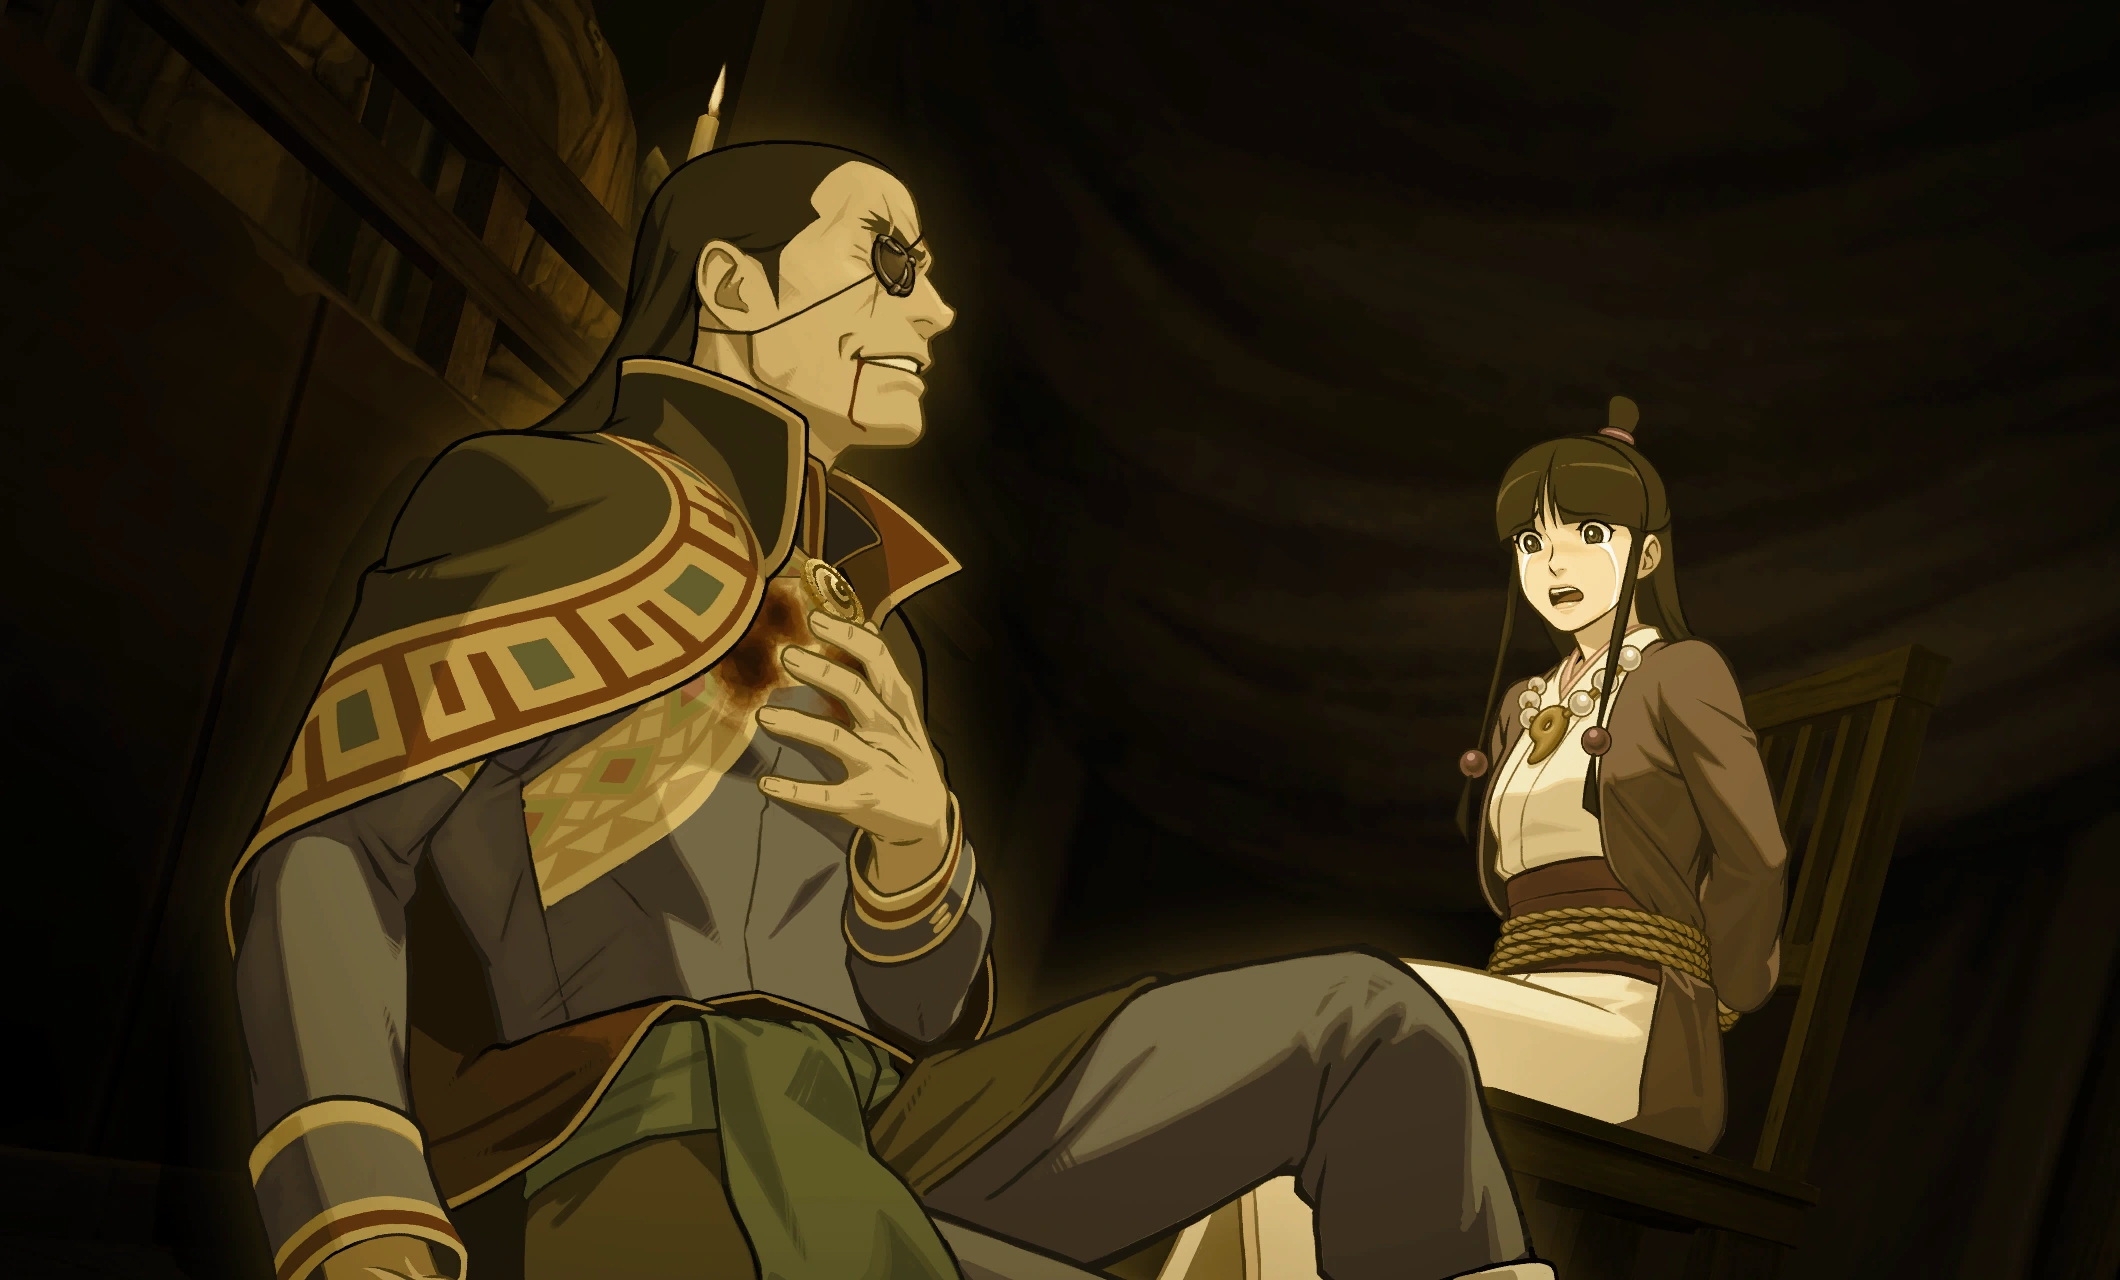
The three met Are'bal at the detention center's visitor's room. Are'bal insisted that Dr. Buff's artifact was the Founder's Orb, showing them the transfer agreement, which referred to it as such. Dhurke, however, noticed a line stating that the agreement was only valid as long as Dr. Buff came to no harm, and Apollo asked if Are'bal had threatened him. Are'bal denied it, saying that a friend of Dr. Buff's had warned him against working with the Defiant Dragons, which Apollo guessed was the work of Atishon. Regarding his incarceration, Are'bal explained that while he had at first been arrested for laughing at a policeman's face, he was currently being held on suspicion of entering the country illegally, and was unable to prove otherwise since he had lost his passport. Regarding the orb, Are'bal suggested that the group try to talk to Dr. Buff's child, whom he warned was severely reclusive.
The trio returned to Dr. Buff's study, whereupon Skye mentioned that Phoenix had come by to look for something a short time earlier. On the floor, they noticed a remote-controlled drone resembling a helicopter gunship. They also retrieved Are'bal's passport from his suitcase, though Dhurke had to pick the lock due to the suitcase being too heavy to carry around. Trucy then left to deliver Are'bal's passport, leaving Dhurke and Apollo alone, awkwardly attempting to start a conversation. Such attempts were cut short, however, when the drone came alive and shot at the pair of them with a toy gatling gun.
Dr. Buff's child spoke to them from a microphone equipped to the drone, self-introducing as "Sergeant Buff". Playing along with Sarge's drill sergeant routine, Apollo learned that the drone was also equipped with a camera, from which the reclusive child could see what was going on outside while maintaining a "siege defense strategy" of never leaving the bedroom. Apollo tried to assure Sarge that he understood what it was like to lose a loved one, but Sarge did not believe him. Six months previously, before the Buff family had moved to Kurain, they had been caught up in an arson attack, during which Sarge's mother had sustained fatal injuries while escaping the burning home with her child. Apollo showed Jove's photo to Sarge, with Dhurke explaining that Apollo's father had also died saving his child from a fire, and Apollo adding that his mother had also disappeared after the fire.
Sarge subsequently warmed up to Apollo and revealed that her father had moved to Kurain Village to help his child recover, even going so far as to resign from an enjoyable job at a university. Concerning the Founder's Orb, Dr. Buff had planned to conceal it in an ideal hiding place, owing to someone else attempting to take it. Apollo and Dhurke decided to look for clues within the study pertaining to the orb's location. They returned to Dr. Buff's desk, where Sarge explained that her father's eyesight had deteriorated with age, hence the reading glasses. With Sarge's help, the two accessed Dr. Buff's computer and discovered an email that he had sent to someone known as "PAW-711", reporting his research on the Founder's Orb.
In the study's shoe cubby, Apollo and Dhurke found a pair of damp walking boots, with one of them containing some kind of glowing moss, leading Dhurke to suspect that Dr. Buff had worn them while going to hide the orb. Apollo also wondered about the damp raincoat after learning from Sarge that it had not rained the previous night. Sarge added that the raincoat had been dry at that time, leading Apollo to conclude that Dr. Buff had used it later in the night. In other words, the Founder's Orb was hidden somewhere that both required Dr. Buff to wear a raincoat, and was home to glowing green moss. With Sarge having no idea where such a place might be, Dhurke remarked that they would have to go to Kurain Village and ask the locals.
"Questions for Pearl"

Pearl's drawing.
As they took in the sights of the village once more, Dhurke suggested the two of them go hunting later, just as they had done in the mountains of Khura'in, only for Apollo to decline. Atishon had plastered the village with campaign posters, but more importantly, there was a crude painting of the Kurain Village bus stop at night, seemingly drawn by a child. The artist turned out to be Pearl Fey, an 18-year-old spirit medium who had assisted Phoenix in some of his past investigations. Pearl told them that chief prosecutor Miles Edgeworth was also in the vicinity, searching for something.
The three discussed the art of spirit channeling. Apollo was brought up to speed on the details of the technique, learning that a medium needed to know the name and face of a person in order to channel them, and that it could only be performed by those of certain bloodlines. Dhurke was surprised that there was a whole village of people capable of the technique when even Khura'in's crown princess had yet to learn it. However, Pearl remarked that most of the women of the village had left for the city, and that she and Maya Fey, her cousin and the future Master, were the only spirit mediums left. The remaining villagers now had to contend with Atishon, who was widely considered a public nuisance, but whom the police were unable to touch due to his family's past influence. Atishon was apparently after the immense political sway that the spirit mediums of Kurain had once held. There was also the influence that Atishon's benefactor apparently had on the village, and Apollo wondered who this benefactor could be.
Apollo asked Pearl about the origins of the glowing moss from Dr. Buff's shoes, with Pearl explaining that it grew on a nearby mountain named Mt. Mitama. Upon learning about Dr. Buff hiding the Founder's Orb, Pearl seemed piece something together, but refused to tell Apollo about it, claiming that all she knew was that Dr. Buff had gone to Mt. Mitama. Apollo's bracelet reacted, and he noticed that when Pearl mentioned the mountain, her thumb would subconsciously rub a piece of green paint on her left index finger, which he guessed was from her painting. Pearl insisted that the painting had nothing to do with Dr. Buff, but Apollo pointed out a green and yellow figure at the bus stop in the painting, figuring out that it was Dr. Buff wearing his raincoat. Pearl then admitted to seeing Dr. Buff the previous night, adding that he had asked her not to tell anyone about him. Pearl guessed that Dr. Buff had gone to a cave in Mt. Mitama, explaining that she had heard of one where mediums would train in ages past, and of mystical ruins that were supposedly hidden within the mountain.

Dhurke and Apollo about to go into the cave.
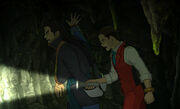
Getting exhausted.
Dhurke and Apollo set off for Mt. Mitama, eventually reaching a large cave that had the moss growing on its walls. As they went inside, an unknown individual handed Apollo a flashlight, before pushing him and Dhurke off a ledge, causing the two of them to fall into a deep cave. Finding themselves unable to climb back out, they resolved to press on, hoping to find the route that Dr. Buff had taken. As the two of them traveled through the cave, Dhurke and Apollo briefly discussed the start of their legal careers, before Dhurke apologized for not keeping in contact with Apollo over the years. An hour into their journey, the ground beneath them collapsed, dropping them both into an underground lake.
"The Caves of Mt. Mitama"
Apollo and Dhurke found themselves in a large cavern containing a set of ancient ruins. They noticed Dr. Buff's footprints emerging from a lake within the cavern. After seeing a discarded plastic bottle and noticing that the lake was saltwater, Dhurke guessed that the lake and cavern were connected to the ocean. Apollo and Dhurke then noticed a locked puzzle box resting on an altar within the ruins. With no clear way out of the cavern, they decided to try and open it, soon discovering that the Song of Ceremony in Dr. Buff's research notes contained the box's solution. They arranged the box's sections in accordance with the Song of Ceremony's lyrics, and sure enough, the box opened to reveal the Founder's Orb.
Dhurke effusively thanked Apollo for his help, and revealed that he planned to return the Founder's Orb to Khura'in for now, as his main goal was to find out who had asked Dr. Buff to study it, and why. He suggested that a member of Khura'in's royal family must have stolen the orb, since they all had free access to Tehm'pul Temple's treasure room. He had no idea why any of the royals would do such a thing, considering the outrage that would occur if it had gotten out that a foreign national had been given access to steal a relic of great religious significance. Dhurke guessed that there was an even bigger secret relating to the orb that would shake Khura'in to its very core.
Dhurke also admitted to a second reason for his revolution: to save Nahyuta. Apollo recalled his own encounter with Nahyuta, remarking that he had changed so drastically from the cheerful and kind child that he had known previously. Dhurke explained that Nahyuta had been a member of the Defiant Dragons with a strong sense of justice, and had become a prosecutor five years ago to bring down Ga'ran's regime from within. While Nahyuta was now one of the queen's top supporters, Dhurke sensed that his heart was filled with resignation and despair, and that Ga'ran was somehow forcing him to follow a path he did not believe in.
Apollo recalled Dhurke's mantra: "A dragon never yields." Dhurke explained that a dragon stood at the pinnacle of the natural world, incapable of being bent to another's will. Apollo took it to mean that a lawyer should pursue the truth like an unyielding dragon, fighting to the bitter end regardless of what it took. This belief powered Dhurke's hope that Khura'in's legal system would one day be restored to its former state, and was the reason he continued to wear his attorney's badge. Dhurke was confident that Nahyuta still believed in this mantra, deep down. Apollo remembered how this unshakable faith and confidence would draw people to Dhurke, and how Nahyuta would proudly declare that he had the blood of the dragon within him. It was because of this that Dhurke wanted to free him from Ga'ran's clutches.
Dhurke then went into the lake to see if he could find a way out, assuring Apollo that he'd return for him. Twenty minutes later, the cavern suddenly started to flood. Unable to swim, Apollo managed to stay afloat by clinging to a piece of driftwood, and was carried up to the tunnel from which they had initially fallen as the water level rose. However, Apollo discovered that the tunnel had caved in, and he slipped and fell back into the water.
Apollo remembered an incident from his childhood in which he and Nahyuta fell into a river and were nearly washed away, but were rescued by Dhurke. Nahyuta asked his father why he would risk his life for them, to which Dhurke responded by asking what kind of father wouldn't do so. He assured both his children that if they ever needed his help, they just had to say so. Apollo then recalled how Dhurke had left him in America, promising to return for him as soon as things in Khura'in were settled, only to never do so. Because of this, Apollo had attempted to forget all about Dhurke, and his childhood in Khura'in. His last thought was him wondering why Dhurke never came back for him.


Dhurke saves Apollo.
However, Dhurke did come back for Apollo, reminding him that he had said he would return. Apollo worried that Dhurke would be unable to stay afloat and support him at the same time, but Dhurke told him not to say anything else, lest he bite his tongue. Moments later, the two of them were pulled under the water's surface.
"A Surprising Reunion"
When Apollo next woke up, he was back in Kurain Village, with Dhurke, Trucy and Are'bal nearby. Dhurke apologized for his late return, and explained that he had made it to the ocean, before getting the help of a nearby fisherman and returning for Apollo. Knowing that Apollo could not swim, Dhurke had the fisherman tie a rope around him, and after he had found his son, the fisherman pulled the pair of them out of the flooded caverns using the rope. Apollo thanked Dhurke for saving his life, to which the revolutionary awkwardly replied that he merely did what any good father would have done. Noticing that Apollo was still hungry, Are'bal revealed that Dhurke had had him get another plate of sushi for his son. This time, Apollo had no hesitation about eating the sushi alongside Dhurke and Are'bal, remembering how, as a child, he used to dine on fish that Dhurke caught. Apollo wished that Nahyuta could be there with them, celebrating the retrieval of the Founder's Orb, and considered joining the revolution if it meant being able to bring him back.
The jovial atmosphere was interrupted by Atishon. He demanded they turn the relic over to him, revealing that he had pushed them into the Mt. Mitama caves in order to "help" them with their search. He called Skye over and claimed that Dhurke had stolen the orb from him. In response, Apollo presented the orb transfer agreement to her, as proof that Dhurke was the legal owner of the orb. However, Atishon claimed that the artifact in question was the Crystal of Ami Fey, meaning that the transfer agreement did not apply to it.
Phoenix then showed up and explained that Atishon had hired him to get the Crystal of Ami Fey back from Dr. Buff, and to handle any legal issues that might arise. He claimed that his return from Khura'in was just a coincidence, and that Atishon was an important client. Phoenix warned Apollo that if Dhurke refused to hand over the orb, he would take the matter to court. Apollo and Trucy was unable to convince Phoenix to back down, so Apollo resolved to go up against his boss for Dhurke's sake. Phoenix warned Apollo that he would not be going easy on him, and left to prepare for the trial, with Trucy following after him. Though Dhurke apologized for helping cause this situation, he suggested that the trial could lead to them learning the identity of the person who had asked Dr. Buff to study the orb. Apollo vowed to do what he could to win the trial, and Dhurke assured his foster son that he had faith in him.
May 17
- 10:08 AM
The next morning, Apollo, Dhurke, and Trucy headed to the courthouse. Trucy was afraid that the trial would destroy the relationship between Apollo and Phoenix, though Dhurke tried to convince her not to worry. Cykes arrived later, explaining that she had gone to the wrong airport yesterday, and was not privy to what was going on. Apollo could only tell her that he was involved in a civil trial before the bailiff summoned him.
Preliminaries
- 10:30 AM
Cykes and judge were, like Trucy, shocked and worried at seeing Apollo and Phoenix on opposite sides of the courtroom. Both of them confirmed that this conflict was real, and proceeded to make their claims on the relic in question. The key issue in the trial would be the identity of the disputed relic, which would determine whether the transfer agreement or Atishon's claims of theft applied to it.
"Cross-Examining Ema"


The e-mail sent by "PAW-711" to Dr. Buff.
Phoenix called Skye to the witness stand, explaining that he had asked her to investigate Dr. Buff. She revealed that many of the artifacts in Dr. Buff's study had in fact been stolen by him, with Phoenix clarifying that he had only done so to study them, and would return them to their original locations once he was done. Skye presented a theft report from "Paul Atishon-Wimperson", which stated that the Crystal of Ami Fey had been discovered stolen on August 25, 2027 at 10 AM. Apollo suspected that Atishon was the "PAW-711" who had gotten Dr. Buff to study the relic, and that Atishon was just using the theft report of the real Crystal of Ami Fey to claim possession of the Founder's Orb. To solidify his claim, Apollo correctly guessed that the numbers "711" referred to Atishon's birthdate. Atishon admitted that he had quietly lent the relic to Dr. Buff, claiming that he had done so to appease the archaeologist.
"Cross-Examining Atishon"
Dr. Buff's research notes regarding the treasure box.
Upon Apollo's request, Atishon described the history of the Crystal of Ami Fey, claiming that Ami Fey had crafted it as a gift to an Atishon lord from Japan. Using Dr. Buff's notes, Apollo pointed out that the disputed relic had a mitamah motif from Khura'in's founding period, but Phoenix was not convinced that this was relevant since Ami Fey was known to have trained in Khura'in. With this line of argument going nowhere for either side, Phoenix revealed that Dr. Buff had, in fact, been murdered. All of the books that had fallen from the bookshelves had come from the archeology shelf at the top, except for the book with blood on it, a psychology volume from the bottom shelf. Phoenix argued that the killer had struck Dr. Buff from behind as he was selecting a psychology book, causing his blood to spill onto it, and that the killer had then staged the scene of an accidental death. According to Dr. Buff's autopsy report, the fatal head wound had come from being struck by the corner of an object.
As for the culprit, Atishon claimed that, at about 10 PM on the evening of the murder, he had seen Are'bal fleeing the crime scene, and that he had not realized that Dr. Buff was dead during that time. When pressed, Atishon specified that he had seen Are'bal running out the front door of the residence while he was underneath a nearby tree, but Apollo pointed out that he should have seen Dr. Buff's body through the window from that vantage point. Atishon was reluctant to respond, but Phoenix assured him that "that matter we discussed" would not damage his campaign, before revealing that Atishon was the anonymous caller who had reported Dr. Buff's death. Moreover, Phoenix had another witness who would tie Are'bal to the murder more concretely, thus rendering the transfer agreement null and void. A brief recess was called, and Dhurke took this opportunity to ask Are'bal about his visit. Are'bal explained that someone had convinced Dr. Buff not to hand the Founder's Orb over to the Defiant Dragons, so the latter had ejected the former from the premises. Meanwhile, Trucy went to see Phoenix, worried that the fallout from the trial would lead to Apollo leaving the Wright Anything Agency.
"Cross-Examining Sarge"


Sarge at the witness stand.


Are'bal sneaking to the window.
Phoenix's witness was Sarge, whom he had managed to bring to the courthouse, but would be testifying via drone. Sarge had heard the argument between Are'bal and Archie, and had seen Are'bal loitering around the building, but claimed not to have seen what had happened in the study, even though Sarge could have easily seen the study through the drone. As Cykes opened her Mood Matrix to examine Sarge's emotions, the drone claimed to have stayed in Sarge's room all night, and subsequently had not learned that Dr. Buff was dead until the following morning. Apollo realized that this was a lie after noticing that Sarge exhibited more shock when describing Are'bal than when talking about finding Dr. Buff's body, and asked what it was that Sarge had seen. This probing only destabilized Sarge's emotional state further as the drone went on a rampage, causing mayhem in the courtroom for some time before calming down somewhat.
Sarge admitted to leaving the bedroom after hearing more arguing between Archie and Are'bal. Sarge had seen Dr. Buff beaming at a flame lighting up the study before passing out. Apollo realized that the flame had triggered the emotional overload of shock and sadness. Cykes argued that Sarge suffered from a subconscious fear of fire that had led to Sarge developing agoraphobia, due to the prevalence of fire in modern day society, with Sarge agreeing with and accepting this assessment
Apollo then asked about the source of the flames, and Sarge claimed to have seen the Founder's Orb on fire, before also claiming to have seen Mrs Buff's face within the orb. Apollo then pointed out that if this was true, it meant that Archie could not have been murdered after Sarge had passed out, since Archie had been able to hide the Founder's Orb within Mt. Mitama before his death. Despite this, Sarge still felt guilty over Archie's death, as it was because of his child's trauma that Archie had moved to Kurain Village in the first place. And despite everything Archie had done, Sarge had never recovered enough to re-enter the outside world as Archie had hoped. Recalling her own trauma over her mother's murder, Cykes assured Sarge that it was not too late to fulfill Archie's wish, as long as Sarge was willing to take that first step forward, with Apollo adding that without a change in tactics, Sarge would never be able to recover. Their words succeeded in winning Sarge over, and the reclusive child declared an end to their siege defense strategy.
A twelve year old girl in a wheelchair then wheeled herself into the courtroom and introduced herself as Sergeant Buff, much to the surprise of Apollo, Cykes and the judge, who had assumed that Sarge was an older male. Sarge informed them that her mother had been in the Russian Army, thus explaining her military obsession, and Phoenix introduced her as Armie Buff. Apollo asked about the wheelchair, and Armie replied that she had become wheelchair-bound following the fire. The judge then asked why Armie's voice was different from that of the drone's, with Armie telling him that her drone had a voice modulation device on it, explaining how no-one had noticed her voice.


Archie Buff lighting the Orb on fire to reveal the Holy Mother.
Armie then requested that she be allowed to continue her testimony, claiming that the figure she saw in the Founder's Orb wasn't her mother, but the Holy Mother of Khura'in and the founder of Khura'inism, causing the last of her voice's discord to disappear. Cykes asked what Armie's statement could mean, while Phoenix had become uneasy upon hearing it. Apollo recalled the third verse of the Song of Ceremony, which claimed that the Holy Mother would return when offered "prayers as fervent of fire", and realised that it was actually a clue to solving the orb's riddle, indicating that it had to be set on fire, thus explaining Archie's actions. Armie wanted to believe that her father had achieved his dream of solving the orb's riddle before his death, and Apollo replied that they would just have to set the relic on fire themselves, which Armie eagerly agreed to. After unsuccessfully attempting to object on Atishon's behalf, Phoenix objected on the basis that Apollo had no right to set a historical relic on fire, but Apollo retorted that he did have that right; until the relic's identity could be determined, any ownership rights Archie had had went to his next-of-kin, who had already given Apollo her permission. The judge ruled in Apollo's favour.


Justice heating the orb with a lighter.
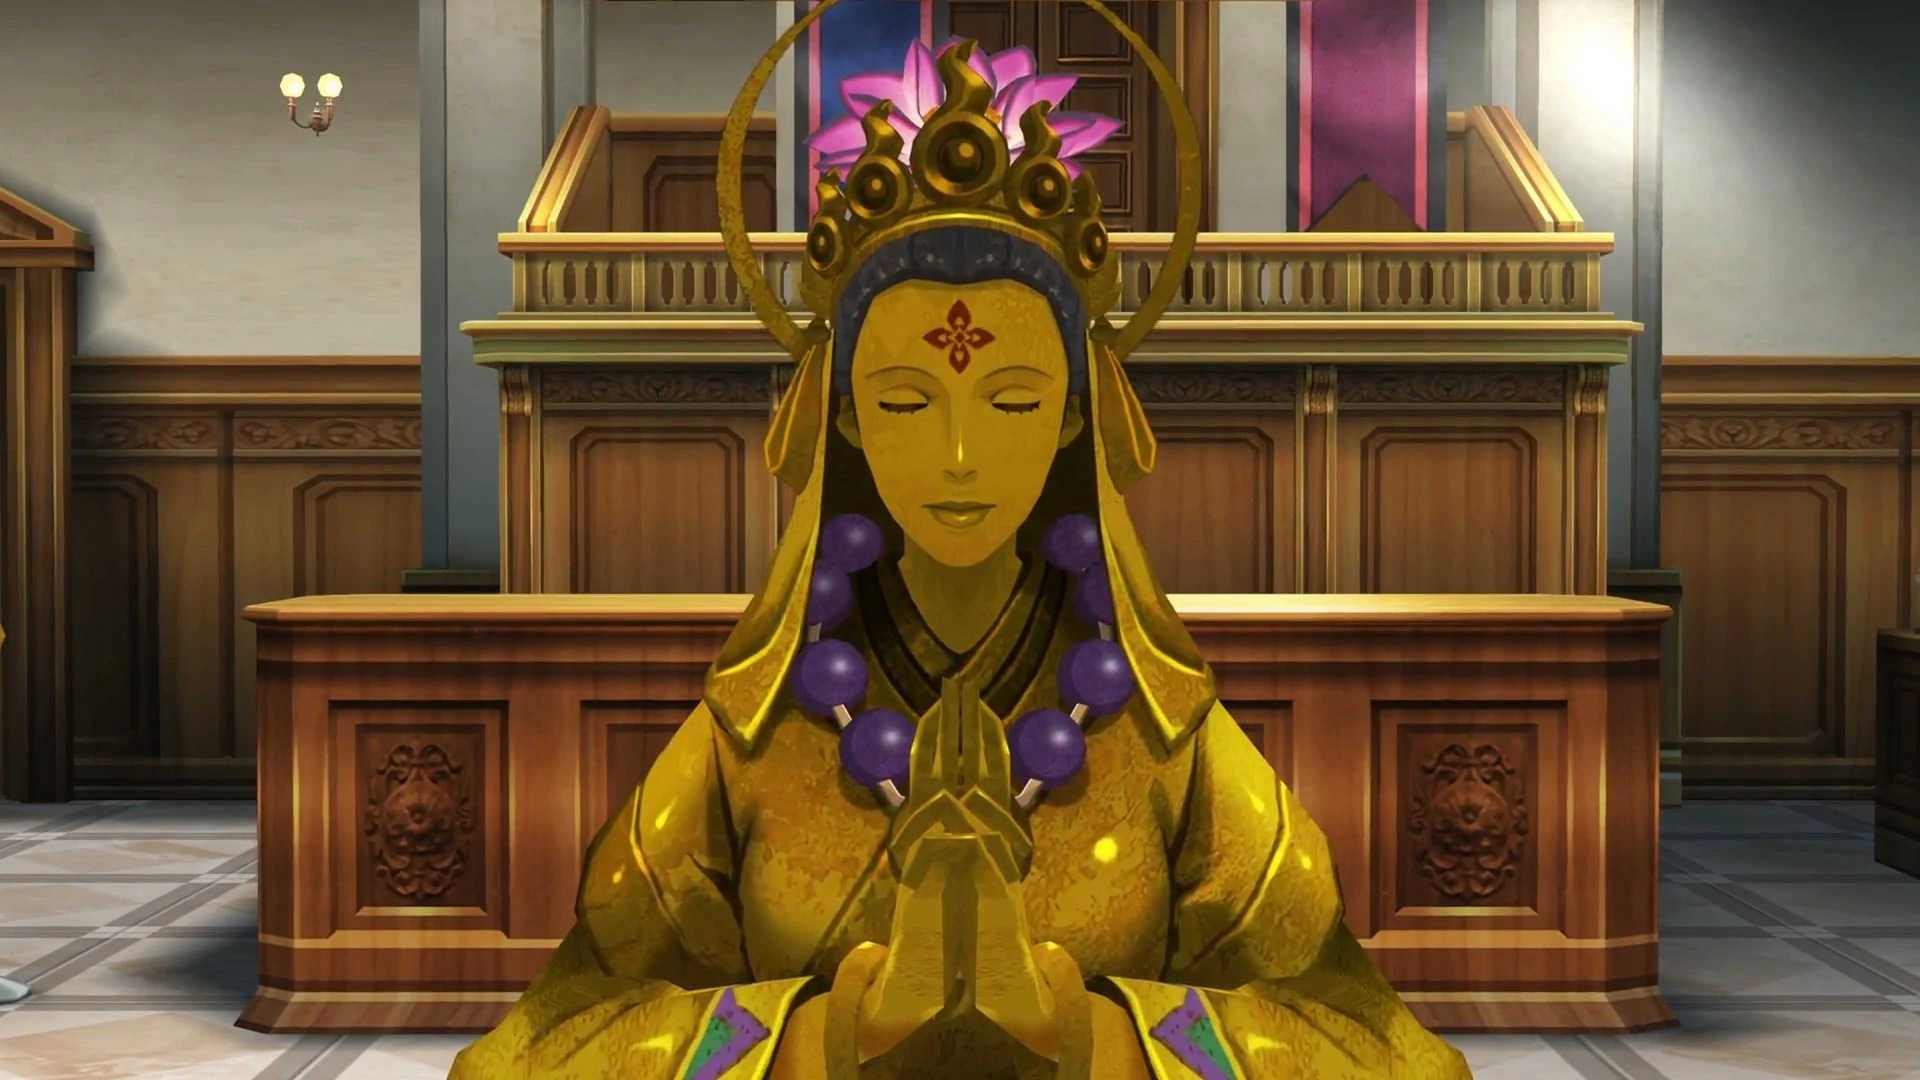
The Holy Mother's face revealed.
Apollo held a lighter up against the relic, which caused the sphere in the middle to melt and drain down into the relic's base, revealing a golden figurine of the Founder. Dhurke noticed that the figurine depicted the Founder's face, despite this being a taboo in Khura'inism, before Apollo declared to Phoenix that this proved beyond any doubt that the relic was the Founder's Orb. Phoenix refused to give up, arguing that Are'bal could have still murdered Archie and thus invalidated the transfer agreement, but Apollo pointed out that there was no proof Are'bal was still around after Archie returned from hiding the orb. Phoenix was unable to come up with a counterargument, despite Atishon urging him to do so, and Apollo told the politician to give up now that the relic's identity had been proven, before mocking him for his lies.
The judge prepared to give his verdict barring any further objections, only for Atishon to interrupt Phoenix as he was reluctantly conceding, the politician unwilling to lose the relic and the election along with it. Phoenix replied that there was nothing more he could do, to which Atishon asked if Phoenix had forgotten "their little chat", causing the lawyer to become agitated. Phoenix then suddenly raised another objection, pointing out that according to the orb's legend, whoever solved the riddle would be granted spiritual power from the Founder, something that had not happened when Apollo set the relic on fire. Apollo argued that the reference to receiving spiritual powers could just be "mystic mumbo-jumbo", but Phoenix reminded him that he was the one basing his claim on the legend, and that the events of the trial did not match with the legend. Thus, Apollo's claim that the relic was the object of the legend was invalid. The judge was unconvinced, but he nevertheless called for a recess instead of ending the trial, while also telling Phoenix to get his act together before court resumed.
Back in the defendant lobby, Apollo, Cykes and Trucy discussed Phoenix's last assertion, Cykes calling it crazy, and Apollo guessing that it was either a bluff, or a desperate last attempt to win the trial. Trucy wondered if there was something going on that they didn't know about, and a worried Cykes left to check on Phoenix. After she left, Armie, now aware that her father had been murdered, then approached Apollo with some new information. She told him that she had passed out on the second floor overlooking the study, right above the coffee bar, but later woke up to find someone pushing her wheelchair, and fled back to her room in terror. She was unable to see who was pushing her in the darkness, but she doubted that it was her father, as he would have said something to her. This lead Apollo to suspect that whoever pushed Armie could be the real killer. Dhurke guessed that the killer would have had a reason for had moving Armie's wheelchair, and Apollo decided to record Armie's statement.
Cykes then reentered the lobby, looking despondent and muttering to herself about what she should do. Upon realising that Apollo had noticed her, she reacted with surprise and claimed that she simply zoned out, and started acting eager for the trial to resume, causing Apollo to wonder what was going on.
"The Final Cross-Examination"
Court resumed, and Phoenix reiterated his previous argument, before claiming to have new testimony that proved Are'bal was the killer. Atishon returned to the stand, and testified to seeing Are'bal use his suitcase to bludgeon Archie to death from outside the study at 11PM. As proof of this, Phoenix revealed that Archie's blood and Are'bal's prints had been found on the suitcase, thus solving the mystery of the murder weapon's identity. Apollo asked how Archie could have failed to notice Are'bal sneaking up on him from behind, and Atishon claimed that Archie had been reading a book at the time, but Apollo pointed out that Archie's reading glasses were found on a desk, meaning Archie wasn't using them when he was killed. Atishon hastily revised his testimony, claiming that he actually saw Archie dozing off at his desk, but Apollo found another contradiction in this argument; if this was true, Atishon couldn't have seen Archie from outside the study, as a smaller bookcase inside would have blocked his view. He proceeded to argue that Atishon was actually inside the study at the time of the murder, and that he was the real killer, but Phoenix pointed out that the suitcase was extremely heavy; only Are'bal had the strength to use it as a weapon.
Apollo turned his thinking around, trying to figure out how Atishon could have used the heavy suitcase as a weapon, and realised that it had been pushed off the study's second floor and dropped onto Archie's head. For this to have been possible, Archie would have to be sat at the coffee bar. Phoenix claimed there was no proof that the murder took place at the coffee bar, but Apollo pointed out the coffee stain on the psychology book, guessing that Archie had been enjoying a cup of coffee at the coffee bar when he was hit by the suitcase. Atishon demanded to know what motive he could have had for killing Archie, and Apollo argued that Atishon had warned Archie about the Defiant Dragons to get the doctor to return the relic to him, only for this strategy to backfire when Archie discovered the relic's true identity and chose to hide it instead. Furious, Atishon had responded by murdering the doctor.
As Atishon struggled to respond, Phoenix suddenly begged Apollo not to accuse Atishon of murder. When asked for an explanation, Phoenix claimed that his client was too important to the nation's future to be hit with a scandal, but did not appear to believe his words. Atishon, who by now had regained his composure, demanded that Phoenix prove him innocent, warning him that something would happen to "her" if Atishon was charged with murder. Apollo meanwhile demanded to know why Phoenix was willing to have Are'bal convicted on false charges, to which Phoenix responded by collapsing against his bench, head in his hands and screaming in despair. Apollo nevertheless started to make his accusation, but was interrupted by Cykes, who revealed that while visiting Phoenix during the last recess, she had overheard a conversation between him and Atishon, from which she learned that Atishon had taken Maya Fey hostage and was threatening her life in order to force Phoenix to obtain the Founder's Orb for him. During the overheard conversation, Phoenix asked Atishon why his benefactor wanted the relic, with Atishon replying that they were hoping to solve its riddle and gain the spiritual power it was said to hold.
Apollo asked Cykes why she hadn't informed him about this, and Cykes explained that Phoenix had told her not to, fearing that it would be harder for him to help Maya if Apollo found out what had happened. Now understanding why Phoenix had been so determined to win the trial, Apollo also realised that he could not have Atishon convicted without putting Maya in danger. As he struggled to figure out what to do, a despairing Phoenix apologised to him, causing the judge, now visibly alarmed, to ask what was going on. Neither lawyer could reply, and Atishon, aware that Apollo had realised the truth, demanded that Apollo retract his accusation, after smugly declaring that his election victory was assured once he delivered the relic to his patron, and that from there he could go on to become president, and then a king, with every politician at his command. Seeing no other option, Apollo started to retract his accusation, but before he could do so, Dhurke suddenly took the stand. He admitted that he didn't understand the current situation, but he nevertheless told Apollo that, as a lawyer, he had no business giving up. He reiterated his creed that "a dragon never yields", stating that even when wounded, it would keep fighting to the bitter end, similar to how lawyers would fight for the truth.
"The Founder's Orb's Secret"
Revitalised by his foster father's words, Apollo resolved to find a way to save Maya and bring down Atishon. Reconsidering all his previous knowledge, he realised that the true final step to solving the riddle of the Founder's Orb was to have a medium channel the founder, an action only made possible by the reveal of the founder's face in the orb. With this knowledge in mind, Apollo assured Phoenix that Maya would be safe, as Atishon could not afford to harm her. He explained his theory behind the orb's riddle, before pointing out that if Atishon or his benefactor were to kill Maya, they would be unable to channel the founder. Though shocked to learn this, Atishon argued that he could simply bribe Pearl to help him, but Apollo replied that Pearl would never be tempted by material gain, or help someone who had threatened her cousin. As for the only other person capable of channeling the founder, the Queen of Khura'in, she would never agree to help Atishon. The politician demanded that Phoenix help him out, but Phoenix replied that while he was obligated to defend his clients, he also had a duty to find the truth, which Atishon had tried to twist for his own benefit. With Maya's fate no longer hanging over his head, he declared that he could not let a murderer escape justice, and promptly resigned as Atishon's attorney, much to Atishon's horror.


Atishon's victory is cut short.
Despite these setbacks, Atishon refused to give up, arguing that there was still no evidence tying him to Archie's murder. With some prompting from Phoenix, Apollo remembered Armie's statement about an unknown individual pushing her wheelchair after she passed out, and guessed that Atishon had done so to move her out of the way and allow him to drop the suitcase onto Archie's head. If so, his fingerprints would have gotten on Armie's wheelchair, and since Armie had fled to her room as soon as she realised what was happening, Atishon would have been unable to wipe them off. Defeated at last, Paul Atishon had a vision of himself winning an election, only to be arrested on murder charges and stripped of the win, before falling into a bottomless pit as he screamed for his grandfather. He then collapsed, unconscious.
The judge stated that, after everything that had been revealed in the trial, the disputed relic was indeed the Founder's Orb, and that Atishon could now be considered a suspect in Archie's murder. Phoenix then thanked Apollo for saving him from Atishon's hold, though Apollo thought to himself that he wouldn't have been able to do so without Dhurke's words of encouragement. The judge then gave his ruling; the Founder's Orb belonged to the Defiant Dragons, as per the transfer agreement. He then remarked that there could be another legal dispute if the Kingdom of Khura'in tried to claim ownership of the orb, to which Dhurke boldly stated that such a trial could lead to an international incident, before promising that bigger and more momentous things were in the air. The judge then declared the court adjourned.
"Post-Trial Wrap-Up"
After the trial, Dhurke expressed his amazement that Apollo actually beat Phoenix, therefore making the revolution more possible, though Apollo remarked to himself that he might not have won if Phoenix hadn't been blackmailed by his client. Trucy asked Dhurke if he intended to have someone channel the Founder, but Dhurke told her that before he could do so, he would need to know the Founder's real name, and that the only person who knew it was the queen of Khura'in. Instead, he stated that he would trace back Dr. Buff's route to find out who Atishon's benefactor was.


Armie can stand!
Soon afterwards, Armie came over to congratulate Apollo and Cykes for their trial win, with both of them congratulating her in turn for her recovery, and thanking her for helping them take down Atishon. Armie then surprised them and Dhurke by getting out of her wheelchair and standing on her own two feet without falling, admitting that her doctor told her she could walk months ago, but that she never told her father, as it would mean having to leave the house. Phoenix then approached the group, informing them that Maya was currently being held in Khura'in, and that her kidnapper was Atishon's benefactor.
| Apollo Justice |
| But as shocking as that news was... it was only the beginning. The beginning of something big -- big enough to shake Khura'in to its very core. ...Revolution. |
As Phoenix described the situation to them, Dhurke figured out what was really going on, and assured Phoenix that Maya was perfectly safe. Before he could explain anything, however, Atishon's benefactor called Phoenix. He revealed that he had been listening in on the whole trial, but claimed that it changed nothing about the threat to Maya. Dhurke called the benefactor's bluff, identifying him as Inga Karkhuul Khura'in despite the latter's use of a voice modulator, and claiming that he did not even have Maya. Minister Inga was flabbergasted at hearing Dhurke on the other end, but told him that Maya was not his only "insurance", and to meet him at Amara's tomb by 3:00 the next day.
Dhurke immediately decided to head to Khura'in, and Edgeworth agreed to charter a plane for him. Edgeworth had been investigating the kidnapping on Phoenix's behalf, and the fact that the real kidnapper was in Khura'in explained why he could not find any connection between Maya and Atishon. Phoenix, Justice, and Cykes agreed to accompany Dhurke. Trucy also wanted to go, but was told to stay behind to look after the agency.
May 18
- 2:30 PM
Justice could hardly believe the circumstances under which he was returning to the country of his childhood. He and the rest of the crew arrived at Tehm'pul Temple with 30 minutes remaining. From there, Dhurke led them to Ga'ran Palace, where Amara's tomb was located. Edgeworth stayed behind to contact the royals and inform them of Dhurke's arrival.
The royal residence
- 2:45 PM
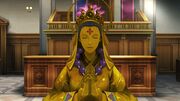
Dhurke made it to the palace courtyard with 15 minutes remaining. Rayfa Padma Khura'in was there, unaware of what was going on. Shortly afterward, Queen Ga'ran Sigatar Khura'in arrived with a contingent of the royal guard, intent on apprehending the rogue Minister of Justice. As the guards surrounded the tomb, Dhurke convinced her to stand down, saying that he needed to make a hostage exchange, and that it would only take 20 minutes. Rayfa found it hard to believe that her father would abduct someone, and said that she had spotted him hurrying toward Amara's tomb alone, 10 minutes prior to Dhurke's arrival.
"There's Been a Murder"
- 3:20 PM
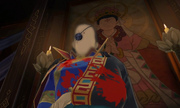
Dhurke standing over Inga's dead body.
With no one coming out of the tomb, the queen ordered the guards to move in. Inside, they found Dhurke standing over Minister Inga's lifeless body, holding a knife, both it and his clothes stained with blood. As Dhurke was being taken away, he covertly passed the Founder's Orb over to Justice. Maya was also inside the tomb, but could barely tell Phoenix that Dhurke had saved her before collapsing, exhausted.
The Agency lawyers decided to regroup at Tehm'pul Temple. Edgeworth, after speaking with the police, told them that Dhurke had been formally charged with Minister Inga's murder, but the Agency lawyers would be allowed to investigate the murder. Ema Skye had also arrived in Khura'in to assist Nahyuta Sahdmadhi. Phoenix and Edgeworth decided to visit Maya at the hospital, while Apollo and Cykes headed to the detention center to speak with Dhurke.
"Interview with Dhurke"
The rebel leader had not been interrogated yet, but he was facing a very public execution due to being charged with both Minister Inga's murder and the assassination of the previous queen, Amara Sigatar Khura'in, 23 years ago. He seemed unbothered by any of this, constantly cracking jokes and even thinking of things to do after getting out. Apollo asked him what had happened in the tomb, but Dhurke could only answer that he had passed out upon entering, and he had already been standing over the body upon regaining consciousness. He had given the Founder's Orb to Apollo for safekeeping due to a feeling he had that it was extremely important, and that Queen Ga'ran would attempt to retrieve it at all costs.
As for Queen Amara, an arsonist had set fire to her private residence, and Dhurke, being her husband, had been put on trial. Although he had essentially won the trial, he had been falsely accused of fabricating evidence. Knowing that a retrial would just turn out the same way, he had run away and hidden underground. Files from his investigation into the incident were stored in his old law office.
Nahyuta soon arrived to take his father in for questioning, revealing that he would be the prosecutor for the coming trial. Apollo tried to get through to him, but Nahyuta was an emotional wall, seeing nothing wrong with convicting his own father. He refused to give any reason as to why he had changed from the boy and man that Apollo and Dhurke had known before, but Dhurke nonetheless told him that the Defiant Dragons would gladly take him back whenever he so chose. Nahyuta insisted that he had moved on and ordered a guard to take Dhurke to the interrogation room, but Apollo noticed the pain on his face and wondered what was really going on.
Apollo and Cykes then headed to the crime scene, where Skye gave them the autopsy report. Minister Inga had succumbed to a stab wound to the back around 3 PM. The tomb had been completely surrounded by guards and searched thoroughly after the discovery of the body, leaving no possible suspects other than Dhurke. Minister Inga had only told a select few of his subordinates of his kidnapping plan, wanting to keep it a secret even from the queen. Maya had been held for six days before being rescued.
"Amara's Tomb"

Crime scene photo.
Skye gave them permission to look around. The body itself had been taken away, but Minister Inga's phone and pistol had been left where they had been found, as well as the murder weapon, a knife whose only identifiable fingerprints belonged to Dhurke. The only calls logged on the phone were with his underlings in his secret police force. The pistol had apparently fired one round before breaking, and only the one round had been found despite the bullet chamber's capacity to hold four bullets. The bullet was found among the statues adorning the left and right sides of the tomb, one of which was broken, presumably from getting shot. Each statue was wearing a spent Magatama of Parting, but there were two of them near the broken statue. A butterfly-shaped pendant was also nearby, stained with Minister Inga's blood, though according to Skye, it did not belong to the victim, and no one in the royal family recognized it.
The blood spatter from the murder had stained the curtain covering the sarcophagus. The sarcophagus itself was locked, but it was temperature-controlled, so no one would be hiding inside. One of the buttons from Minister Inga's jacket was found in one of the incense burners, caked in soot. There were also curtains on either side of the entrance, though Skye reminded Cykes that the whole place had been thoroughly searched. While examining the chair to which Maya had been tied, Apollo and Cykes discovered a bloodstain. A luminol test revealed a trail of blood droplets leading from the chair to the sarcophagus, but Skye tested it and it did not belong to Minister Inga.
As Apollo and Cykes were discussing what they had learned, Nahyuta walked in. He tried to run away when Apollo tried to ask him about Dhurke again, but Apollo caught up to him outside. Nahyta admitted that the queen had specifically requested him to prosecute for the trial, and argued that his relationship with the accused did not matter when it came to the law. Apollo asked whether Nahyuta knew anything about the other "insurance" that Inga had held to make Dhurke comply with his demands. Nahyuta denied knowing anything about this, and even squeezed Apollo's bracelet to render it useless against him. Apollo was left wondering whether he and Dhurke even mattered to Nahyuta anymore.
"Phoenix and Edgeworth"
Meanwhile, Queen Ga'ran summoned Phoenix and Edgeworth to the palace to talk about the case. Phoenix confirmed that Minister Inga had been after the Founder's Orb, to which the queen concluded that he had been attempting a coup. Since only those possessing spiritual power could lay claim to the throne, Inga had sought to use the orb's fabled power to gain legitimacy as ruler. In accordance with Phoenix's original theory, Pees'lubn Andistan'dhin had stolen the orb under Inga's orders.
Phoenix used this opportunity to probe the queen about Dhurke and the Defense Culpability Act. Ga'ran described the negative impact of Dhurke's trial on the faith of the people in Khura'in's legal system, since Dhurke had been a well-respected lawyer. Upon ascending to the throne in Queen Amara's place, she had enacted the Defense Culpability Act as a way of punishing perjury and phony evidence. Phoenix protested that the law had effectively rendered lawyers extinct, and that the Divination Séance had proven incapable of ensuring a fair trial. The queen replied that crime rates had plummeted since the law's enactment, and argued that it was worth the sacrifice.
Phoenix and Edgeworth decided to leave it at that, and Ga'ran asked them what had happened to the Founder's Orb. Phoenix did not know, since Dhurke was the last person to possess it to his knowledge. The queen wondered if the young lawyer at the scene knew anything, and asked Phoenix if they were related. Phoenix told her that Apollo was Dhurke's son, prompting her to whisper something to a guard before dismissing him and Edgeworth.
Phoenix headed to the bazaar and found Princess Rayfa there. She was adamant that someone must have set her father up, and asked Phoenix to help her investigate his private quarters. She went ahead of them and Phoenix lost sight of her, but he nonetheless was able to find the private quarters. He overheard Rayfa inside mourning over her father's death, and was reminded of Trucy. She eventually returned outside and warned them about a spilled urn near the entrance, caused by a small dog a short while ago.
"Rayfa the Investigator"
Phoenix grew worried about Rayfa having to perform a Divination Séance for her own father's murder. Moreover, Nayna, her attendant, had gone missing. Rayfa had briefly glimpsed her at 2 PM, and that was the only time she had seen her since morning. Phoenix and Edgeworth wondered if Nayna was connected to the case somehow.


The photo found in Inga's safe.
Phoenix looked and found footprints heading through the entrance, over the puddle, into the private quarters, where the muddy footprints continued. A table inside contained painkillers for Inga's back, as well as notes on prominent physical characteristics of various people, including people he must have seen every day. While examining a gold bust of Inga, he inadvertently triggered a switch to reveal a combination lock for a safe, which he used Rayfa's birthdate as the code to open successfully. Inside was a letter from Rayfa to Inga from when she was eight years old, as well as a plan to poison the queen and use the power of the Founder's Orb to replace her as ruler. Phoenix also found a photo of a woman with a baby, with a law book with a Defiant Dragons brand visible nearby. Rayfa was shocked at seeing the photo, and immediately left to confront her mother.


Ur'gaid's photo.
Hearing a commotion outside, Phoenix and Edgeworth left to find Ahlbi Ur'gaid chasing his dog Shah'do. Phoenix saw that he had Nayna's hat, and Ur'gaid explained that Are'bal had startled Shah'do with one of his firecrackers at 2 PM, causing the dog to run into the palace courtyard, where he had stolen the hat. Ur'gaid had gotten lost while looking for his dog, and at 2:10, he had peeked into a room inside the palace to see the queen channeling a spirit for a neighboring nation's king. He gave Phoenix a photo he had taken of the event. Ur'gaid and Shah'do had access to the palace via a small hole in the palace wall just large enough for Ur'gaid to fit through. It also turned out that Shah'do was the dog that had spilled the urn earlier.
"Apollo's Narrow Escape"
Back at the bazaar, the queen's secret order was being carried out as members of the Ga'ran Royal Guard gave chase to Apollo and Cykes. Apollo remembered the sewer passageway leading to Dhurke's office, and the two hurried there to escape. Phoenix and Edgeworth were not far behind, having heard about them from Ur'gaid. Are'bal had also holed up here, and told Apollo that Dhurke was hoping that he would take over the office some day, after the legal system had been restored.
After a brief tour of the old office, Apollo and Cykes found the file on the arson incident. According to the documents, Queen Amara had been slipped a sleeping pill, and the lighter found at the scene had borne Dhurke's fingerprints. Apollo's biological father had been killed inside the burning residence by a blow to the head, and his passport and photos had all been consumed in the fire, so no Divination Séance could be performed on his spirit. Are'bal explained that Dhurke had invited the musician over to Amara's residence on the day of the arson, though he had only known his stage name at the time. Jove had also brought Apollo with him, and Dhurke had rescued him from the fire. Dhurke had also searched for Apollo's mother, but he had no leads. Are'bal also pointed to details of Nahyuta's expulsion from the royal family, due to the deeply rooted notion in Khura'in that "the sins of the father are visited upon his children."
Beh'leeb Inmee entered the office with some people who had come to ask for aid with regard to the wrongful accusations of loved ones. Are'bal remarked that Inmee had been doing this for quite some time now, and more citizens had been coming around to their cause since Phoenix had revealed the truth of the so-called "DCA Tragedy". Having his own role to fulfill, Apollo decided to have another talk with Dhurke. He left the Founder's Orb in Are'bal's care before leaving with Phoenix and Cykes.
"Dhurke's Confession"
Nahyuta had finished interrogating Dhurke by the time Apollo got to the detention center. Dhurke told him that Nahyuta had taken all of his remaining possessions except his attorney's badge. According to Dhurke, Nahyuta had moved to confiscate the badge, but had decided against it. Apollo wondered if this meant that Nahyuta remembered what Dhurke had told him as a child.
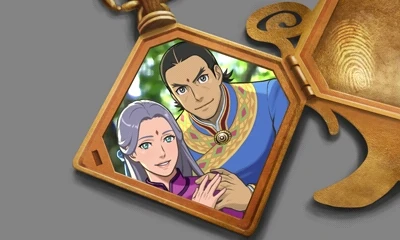

Dhurke and Amara.
Apollo asked about the butterfly pendant, but while Dhurke initially acted shocked, he claimed that it was just something he had bought before asking Apollo to return it to him. Apollo decided to ask who it was that Minister Inga had used to get Dhurke to comply with his demands. He guessed that it was a woman in Dhurke's life, but Dhurke insisted that Amara was the only woman for him, even though she was gone. Apollo's bracelet reacted, and he noticed that Dhurke's left arm would tense up when he mentioned Amara. Dhurke had placed the butterfly pendant inside his left jacket sleeve, so Apollo took a closer look and found a photo of Dhurke and Amara inside. Apollo realized that Amara was the woman in the photo from Minister Inga's safe. However, the branded law book in the photo proved that it was dated from after the fire that had supposedly taken Amara's life.
Dhurke explained that he had heard rumors of Amara still being alive, so he had found her inside the palace and whisked her away. However, their time had been brief before she was found and taken back. Nahyuta knew about his mother, and Dhurke suspected that his actions under Ga'ran had something to do with her. Apollo guessed that the baby in Minister Inga's photo was Nahyuta, and concluded that it had been taken shortly after the fire. Phoenix noted that they would have to ask Queen Ga'ran at some point about Amara.
Before the lawyers left, however, Dhurke told Apollo that he did not have long to live, regardless of the outcome of the trial. He gave no details other than confirming that it was similar to a terminal illness, and saying that it was too late to change anything about it. He also told Apollo that he might discover another big secret during the trial, one that he would find difficult to accept. However, Dhurke had faith that his son would be able to handle the truth and win the case.
"Power to the People"
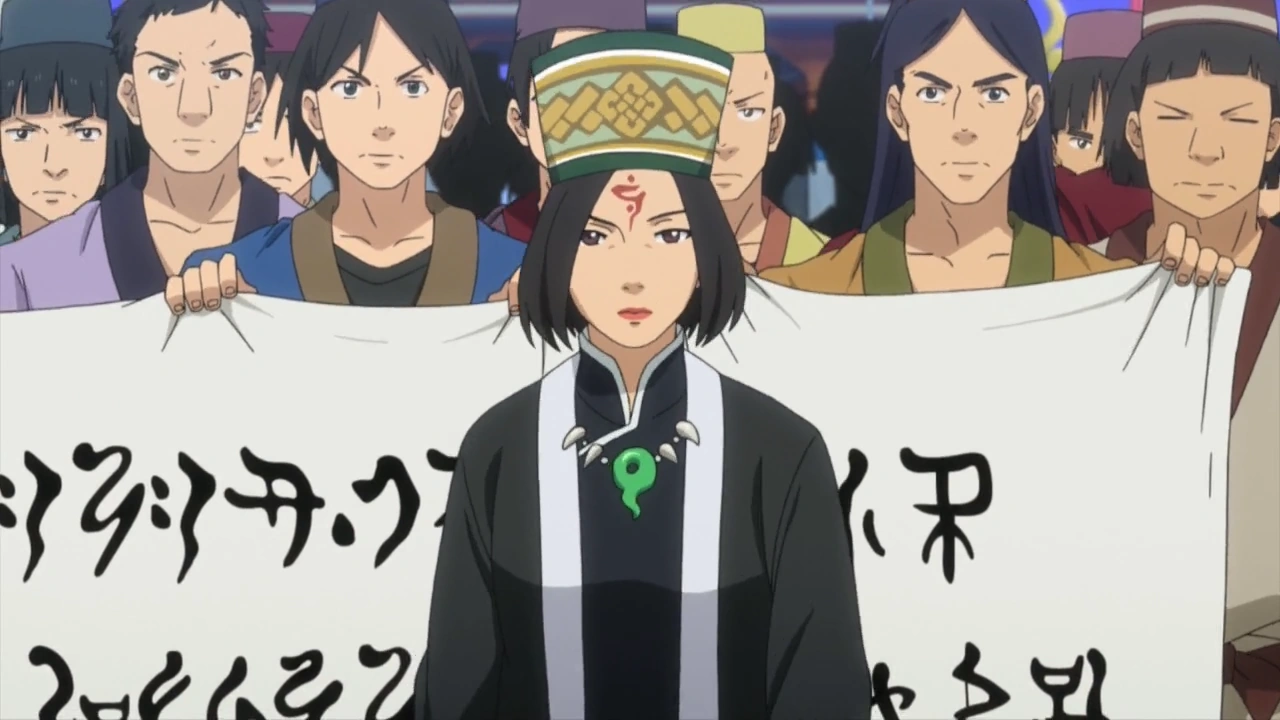
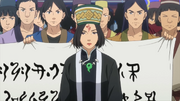
Beh'leeb Inmee leading the rebels.


Datz Are'bal also leading the rebels.
The lawyers returned outside where they saw a large group of rebels, led by Are'bal and Inmee, descending upon Tehm'pul Temple, demanding Dhurke's release and the nullification of the DC Act. Nahyuta told them that it was useless because reinforcements were coming, and that all of them would be arrested and tried en masse under the Act. Nahyuta remained stoic even as Apollo told him that Dhurke was dying, and did not respond when asked if he was following Ga'ran's orders because Amara was being held captive. He told Apollo that his efforts at helping Dhurke were futile and hopeless, and that clinging to hope would only lead to further despair. Cykes sensed a combination of anger, shock, bewilderment, and sorrow within Nahyuta as he was talking.
The lawyers decided to go speak with the queen. They overheard Princess Rayfa arguing with Queen Ga'ran, and Phoenix realized that she must have been told the truth about Amara. Apollo confronted the queen about Amara, but learned nothing new. Queen Ga'ran had the guards search Apollo for the Founder's Orb, but they came up empty. Rayfa demanded that the people be told that Amara was still alive, saying it was her duty as royal priestess to speak the truth, but Ga'ran replied that Phoenix had poisoned her mind, and took her elsewhere for "discipline".
The lawyers returned to Dhurke's office to collect their thoughts. Despite everything that they had learned, the true killer and motive behind Minister Inga's death still eluded them. Moreover, despite Amara being alive, Dhurke could still be convicted for attempted murder, and the fire had erased nearly all evidence from that incident. It was decided that Apollo and Phoenix would stand at the defense's bench, and Cykes would remain in the gallery and not risk her life on this trial.
May 19
- 8:50 AM
Before the trial, a group of rebels stormed the High Court of Khura'in, but were promptly removed by guards.
Preliminaries
- 9:28 AM
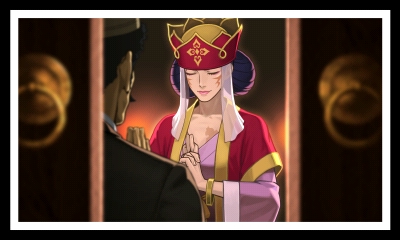
Phoenix, Apollo, and Cykes arrived, and Are'bal came to give the Founder's Orb back to Apollo. The wide reach of the Defense Culpability Act meant that the fate of the entire revolution depended on the outcome of Dhurke's trial. In court, Nahyuta seemed distracted but insisted that he would be able to go through with the trial. Queen Ga'ran was unconvinced, however, and decided to play the role of prosecutor herself. Apollo learned that the queen had once been a renowned prosecutor and had even taken the prosecutor's bench in Dhurke's past trial.
Ga'ran wore her old prosecutor garb and summoned Rayfa to the stand. Nahyuta and the judge tried to spare her the need to perform the Divination Séance for her beloved father, but Ga'ran convinced her to go through with it. Because Nayna was still missing, Phoenix removed Rayfa's robe for her to perform the Séance. However, the Séance failed, and Rayfa collapsed. Ga'ran decided to call Dhurke to the stand to hear his side of the story.
"Cross-Examining Dhurke"
As expected, Dhurke's testimony was vague and unhelpful. He still had no memory of the time between entering the tomb and holding the knife, but he argued that, due to his insistence on a bloodless revolution, murdering Minister Inga would have gone against his beliefs. Ga'ran argued that no third party could have been at the tomb to plant the knife on him. Moreover, Ga'ran had already commissioned a DNA test on the bloodstains that Apollo had found, confirming that the blood belonged to Dhurke. Nonetheless, Apollo suggested that Minister Inga could have been killed before Dhurke had ever set foot in the tomb, so Ga'ran summoned Rayfa back to the stand.
"Cross-Examining Rayfa"
Rayfa testified that she had seen her father at 2:30. He had let out a scream and bolted from his private quarters to the tomb, his face pale. She claimed to have seen no one other than him between 2:00 and 2:45, but Apollo knew that Shah'do had stolen Nayna's hat during that timeframe, so Rayfa must have seen it happen. Saying that Ga'ran had told her to withhold this information, Rayfa admitted that she had run down from her second-floor veranda to help Nayna, but Nayna had disappeared by then. Ga'ran explained that the footprints found outside belonged to Minister Inga, and the ones inside belonged to Nayna, so Nayna must have gone inside Inga's private quarters after the incident with Shah'do. Rayfa stated that the incident had occurred at 2:15, giving Phoenix and Apollo the idea that Nayna had attacked Minister Inga at his private quarters. Apollo theorized that Nayna had stabbed him as he was trying to escape, but he had not noticed due to his painkiller shots, and had bled out in the tomb after removing the knife there.
Knowing that Apollo had no evidence of his theory, Ga'ran offered to pardon him and Phoenix if they abandoned the case now. The fact that they held their ground shocked Rayfa, and Apollo explained that he had a duty to defend his client, even if it meant risking his own life. His case had only one avenue left, the Divination Séance. Ga'ran told Rayfa to leave, saying that she had already failed the Séance attempt and that her insights had proven faulty. Phoenix disagreed, saying that her Séances had been vital in reaching the truth, and that she only needed the courage to face her father's death to succeed. Seeing the lawyers' conviction, Rayfa defied her mother and swore to fulfill her duty.
"Divination Séance"

The faceless figure.
Apollo's theory was nullified as the Séance vision showed Minister Inga waiting inside the tomb, then hearing a man's voice before being stabbed. Minister Inga had looked upon his killer, shown in the vision as a faceless being dressed like Dhurke, and had attempted to fire his pistol. The last sounds he had heard were an explosion followed by laughter. Rayfa believed that the voice belonged to Dhurke, but Apollo pointed out that he had not visibly reacted at all to the voice, so he must have been calling someone. Refining the vision to clarify the sounds occurring on the other end of the call, she claimed that the call had come from a subordinate at the palace. Apollo identified the roar of a warbaa'd, placing the caller at the bazaar, and concluded that the real source of the explosion and laughter was Are'bal using his firecrackers and laughing at a spooked Shah'do.
All this meant that Minister Inga had been murdered at 2 PM, long before Dhurke's arrival. At that time, the palace guards had been stationed inside the palace for the queen's spirit channeling rite, leaving the courtyard unguarded. Phoenix and Apollo speculated that the faceless figure was due to a disorder on Minister Inga's part, as evidenced by his notes on other people's physical characteristics. Ga'ran confirmed that he had been afflicted with prosopagnosia, and Rayfa mentioned that there had been cases like this with past Séances. Ga'ran reminded Apollo that Minister Inga had been sighted at 2:30, which led to the realization that someone had channeled him at that time. Since Ga'ran had been meeting with a neighboring nation's king at the time, Apollo concluded that Maya may have channeled Mininster Inga, and requested that she testify.
"Cross-Examining Maya"
There was a short recess to prepare for Maya's arrival, but during this time, Dhurke escaped. He only told Are'bal that he had to set Amara free, before vanishing from his sight. The queen ordered that the trial would continue without him, and Maya was brought to the stand. She was shocked at the fact that Dhurke was being tried, as well as Apollo's theory that she had been forced to channel Minister Inga. Apollo failed to get any further information out of her, but pointed out that whoever had channeled him must have worn his clothes while doing so, then burned them, as evidenced by the button found in one of the incense burners. Nonetheless, it was impossible for Maya to have channeled Minister Inga, due to a variety of reasons but most importantly because the minister's full name was only known to the royals due to being so long. The only other person who could possibly have had the opportunity to channel Minister Inga was Nayna, who had only left footprints inside his private quarters but not outside.
"A New Witness"
Nayna showed up on the stand, claiming that she had just taken a long rest, and that Ga'ran was the only Khura'inese spirit medium left. Apollo revealed that not only was Queen Amara still alive, but Nayna was Amara. If Amara were dead, then Ga'ran would have been able to channel her on request. Amara was forced to reveal herself, but pointed out a fatal flaw in Apollo's reasoning. If a spirit medium had channeled Minister Inga and entered the tomb, then there was no way for her to have left without being spotted by Rayfa or being found by the royal guard.
"A Cruel Truth"

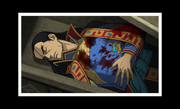
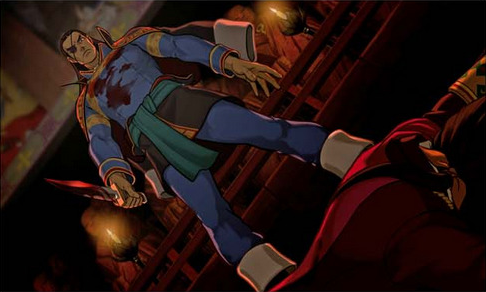
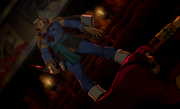
Photo of Dhurke's body.
Apollo figured that the only way for Amara to have escaped undetected was to channel someone. The implication of this slowly dawned on him as he realized that Dhurke and Maya were the only ones who had emerged from the tomb, and only Dhurke's blood indicated that there had been a second victim. Skye searched Amara's sarcophagus and found Dhurke's body there. Apollo and Nahyuta were devastated, but Apollo remembered Dhurke's faith in him even while knowing the terrible truth that awaited him. The body was at least three days old, which meant that Maya had been channeling Dhurke the whole time he had visited the States.

Dhurke's last moments.
Maya explained that Dhurke had come to rescue her from Minister Inga's clutches. However, before they could escape, Inga had discovered him and shot him three times. Dhurke had bluffed that he was fine, scaring Inga into missing his last bullet and running away. As he lay dying, Dhurke had requested that Maya channel him so that he could see his son one last time.
Apollo explained the chain of events after Minister Inga's murder. Amara had channeled Inga in his private quarters, who had hurried to the tomb, where Amara terminated the channeling. After Dhurke had entered the tomb, Amara had forced him out of Maya's body using a Magatama of Parting. Maya had immediately passed out from exhaustion, and Amara had then dressed her in her usual clothes before tying her up. She had then put some of Inga's blood on Dhurke's clothes before wearing the clothes, picking up the knife, and channeling him.
"Beyond Despair"

Brighter version of Ur'gaid's photo.
Amara and Nahyuta demanded evidence of Apollo's theory. Apollo wondered why Nahyuta was still helping Ga'ran, but nonetheless presented the butterfly pendant as evidence that Amara had been in the tomb at the time of the murder. He noted that the photo of Dhurke's body showed a nearly identical blue pendant, and that the pink pendant had a fingerprint inside. Apollo told Amara that Dhurke had lied about the pink pendant to protect her. Amara confessed to the murder of Minister Inga, admitting that she could not let go of the pink pendant that would end up incriminating her.


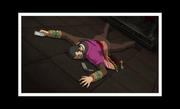
Amara is shot by a royal guardsman.
The judge was about to declare Dhurke innocent of both charges, but something did not seem right to Apollo. He asked Amara to explain her motive, and his bracelet reacted when she described entering the tomb to kill Minister Inga. Her hands moved to her chest, and a finger on her left hand twitched when she mentioned the Rite of Channeling at 2 PM. Apollo presented Ur'gaid's photo, which Skye brightened to reveal a burn scar on the queen's chest. Ga'ran did not possess a burn scar on her chest, but it was revealed that Amara did, which meant that Amara had disguised herself as Ga'ran to perform the Rite of Channeling. The real killer was Ga'ran, who had made Amara pin the murder on Dhurke while giving her an alibi. Apollo demanded that Amara admit to all this, but before she could say anything, a royal guardsman shot her down, and she was rushed to a hospital.
"The Truth Comes Out"


Nahyuta takes the stand.
When court resumed, Nahyuta confessed to the murder. He claimed that Nayna had covered for him, and he had not recognized his mother due to not having seen her since her rescue by Dhurke 15 years ago. Apollo realized that he had been wrong about the date of the photo from Inga's safe, and concluded that the baby was Rayfa. He realized that Ga'ran had revealed to Rayfa who her biological mother was as her "discipline", and that the shame that would result from being revealed as a child of a criminal was the reason Nahyuta and Amara continued to carry out Ga'ran's orders, even potentially at the cost of their lives. Apollo appealed to what little hope Nahyuta had left, as evidenced by his decision not to take Dhurke's badge. The only way to save both Nahyuta and Rayfa was to clear Dhurke's name in the arson incident. Fortunately for them, Dhurke had found a lead: the photo of Jove, which would allow a Divination Séance to be performed.
"23-Year-Old Truth"

Jove trying to save his son.
In the Séance vision, Jove was inside the burning residence with an infant Apollo, with an unconscious Amara nearby. He was attacked from behind, and his assailant tossed a lighter to the floor. Jove then reached out toward his son before falling unconscious. The attacker's hand was visible through a reflection, wearing gloves. After Rayfa refined the vision to show the hand more clearly, it was found to be wearing one of the Cuffs of Justice worn by the justice minister. Knowing that Ga'ran had held that position at the time, Nahyuta realized that Ga'ran had deceived him all along, and retracted his confession, declaring his support for the revolution at long last.
With Nahyuta's retraction, Minister Inga's murder was open to deliberation once more. Rayfa testified that she had seen Ga'ran enter the palace from the courtyard, but had not seen her carrying anything resembling Dhurke's clothes. Apollo deduced that the killer had taken the clothes from Dhurke's body, and pointed to a bloodstain on Dhurke's arm that did not match up with his gunshot wounds, suggesting that it was Inga's blood. Furthermore, only a member of the royal family could have hidden the clothes in the sarcophagus, and Ga'ran was the only such person without an alibi.
With no arguments left, Ga'ran attempted to get Apollo to retract his indictment. She argued that Nahyuta would be convicted under the Defense Culpability Act for giving false testimony to protect her. She also branded all of them terrorists and, arguing that no one was yet ready to succeed her as leader of Khura'in, decreed a law making any threat against the crown punishable by death. She then called in a group of her royal guard to hold them at gunpoint, daring them to defy her.
"Revolutionary Truth"


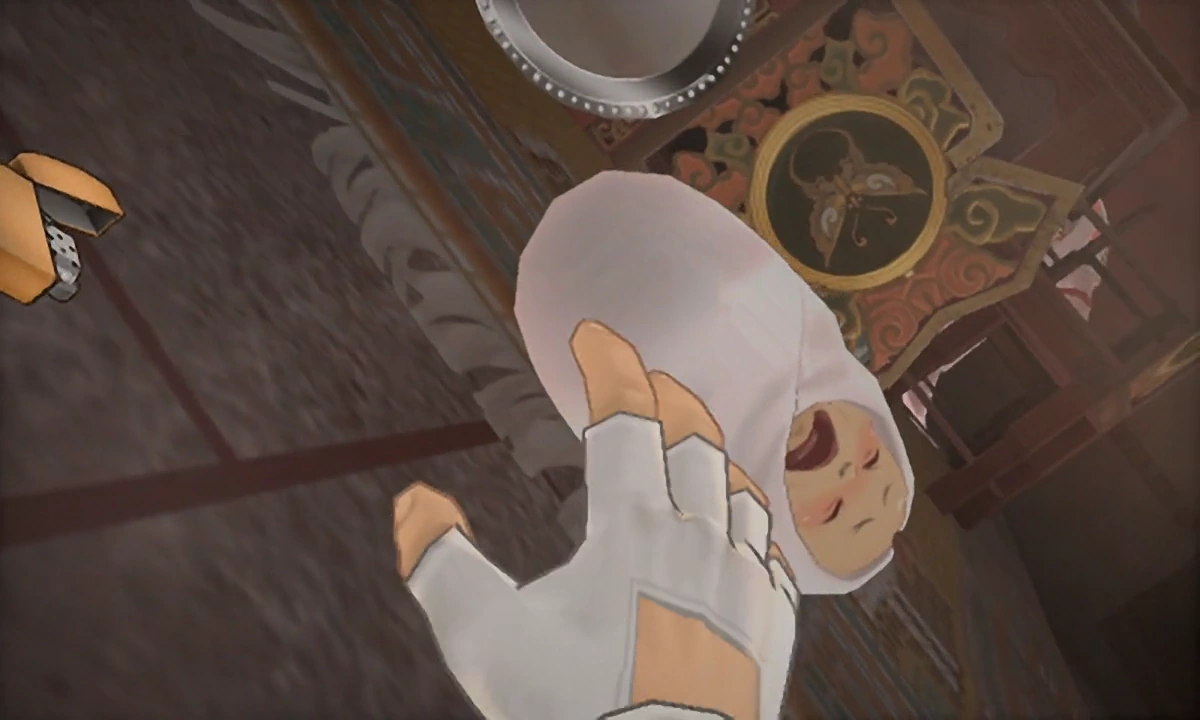
The queen collapses into the Pool of Souls after failing to channel the Holy Mother.
Refusing to back down, Apollo realized that the only avenue left was to dethrone the queen immediately. Asking himself why Ga'ran was fixated on the Founder's Orb even though only she and Amara could have channeled the Holy Mother to begin with, he concluded that she sought spiritual power for herself because she could not actually channel spirits. This would render her rule, and all of the laws she had passed, illegitimate under Khura'inese law. Apollo confronted Ga'ran, giving her the relic that she had so desperately sought, and demanding that she channel the Holy Mother to prove to the whole court that she could. Finally backed into a corner, Ga'ran desperately attempted to channel the Holy Mother, only to fail and find herself surrounded by her own guards, whose feelings of excitement had transitioned into confusion and then betrayal. She finally collapsed into the Pool of Souls and was taken to the infirmary, under the delusion that she was the Holy Mother.
The court took the time to answer some lingering questions before adjourning. Nahyuta speculated that Ga'ran had developed a complex over her inability to channel spirits, so she had staged Amara's assassination and gotten Amara to pose as her during Rites of Channeling to give the impression that she had immense spiritual power. Amara had complied with her demands, initially believing that she was protecting her from Dhurke, and later to protect Rayfa. With everything resolved, the Sahdmadhis were cleared of all charges, finally paving the way for the revolution.
Apollo's decision
Phoenix commended Apollo on his work, saying that he had full respect for him as a lawyer for the perseverance that he had shown. Trucy joined in the celebrations, having smuggled herself into Khura'in by hiding in one of Edgeworth's suitcases. Rayfa thanked Apollo and Phoenix for helping her confront her aunt, to which they replied that they had simply given her the opportunity. As for the future of the royal family, until Rayfa had mastered spirit channeling, Nahyuta would be acting as regent on her behalf, and Queen Amara would perform the Rites of Channeling. Apollo offered Dhurke's badge to Nahyuta, saying that he deserved to have it as the man who would carry out Dhurke's legacy. However, Nahyuta asked Apollo to stay in Khura'in and help him rebuild the legal system. Cykes and Trucy wanted Apollo to go back to America with them, but ultimately they would respect his decision either way.
May 20
- 8:00 AM
The next morning, Phoenix, Cykes, and Trucy waited for the bus to take them to the airport. Apollo caught up with them and announced that he had decided to stay in Khura'in. He wanted to pick up where Dhurke had left off, and teach other prospective lawyers in Khura'in what Phoenix had taught him about being a lawyer. He promised that he would return to the U.S. when his work was finished. As the bus arrived, Apollo thanked Phoenix for everything.
Apollo returned to Dhurke's former office with Are'bal and Ur'gaid to clean up the place and prepare it for use once more. A royal parade approached, and the three took a break to watch Rayfa and Nahyuta pass by. As Apollo looked on, he felt that he saw Dhurke smiling at him. Apollo smiled back and watched as a Khura'inese butterfly flew back to the office, perching on the new sign reading, "Justice Law Offices."
Where are they now?
- Trucy put on a show with Mr. Hat, who admitted to missing Apollo as they shared a rivalry. Trucy resolved to visit Apollo in Khura'in.
- Inspired by Apollo, Ur'gaid decided to focus his efforts in developing Khura'in's tourism industry.
- Edgeworth personally congratulated Skye on achieving her dream of becoming a forensic scientist. Skye admitted that Nahyuta had requested her presence in Khura'in to assist in more investigations. Edgeworth suggested that she rise to the challenge, which Skye accepted, determined to aid Apollo in his efforts.
- Much to Betty de Famme's annoyance, Apollo's reveal of the secret behind the "teleportation" trick meant that both she and Bonny de Famme were out of a job. Bonny suggested they accept Trucy's offer to join the Wright Anything Agency, ticking Betty off as it reminded her of her rivalry with Trucy.
- Beh'leeb gave birth to a healthy baby boy named Faitah, whom she paralleled with Khura'in's new revolutionary era. She expressed hope that Tahrust and Dhurke would watch over them. Are'bal assumed his Defiant Dragons pose, intending to teach it to Faitah as a sign of manliness, which Beh'leeb laughingly rejected.
- Cykes' workload at the office doubled due to Apollo's absence. She expressed determination to become a lawyer worthy of Blackquill's respect, despite secretly worrying that she might not be up to the task.
- To the annoyance of Simon Blackquill, Bucky Whet delivered his order of noodles in a drunken state. As Whet suffered nausea once again, Blackquill mused on the difficulty of finding good help.
- Uendo Toneido decided to work harder at his rakugo, creating a new story based on Taifu Toneido's murder. His split personalities intended for this to make up for tampering the crime scene, and also to provide the fourth personality, Owen, training as well.
- Armie prepared herself for a new life outside of her "siege defense". Notably, the university where her father worked at invited her to go on a dig. She hoped to find a forgotten civilization and name it in her father's honor. She also planned on visiting Khura'in on another dig to see if Apollo was slacking off.
- Maya returned to Kurain Village, determined to revolutionize her hometown now that she is the Master. Pearl hoped that the plans included a new shopping mall where she could buy new clothes, but conceded that it was not a priority.
- Rayfa requested Amara for a "new Nayna", now that Amara had revealed her true identity. Amara mused that Rayfa had been rather demanding of her when she played the role of Nayna, suggesting that few would be willing to serve said role. Rayfa admitted that she intended to make up for acting spoiled, to which Amara requested for one of her shoulder rubs.
- Much to Nahyuta's consternation, Rayfa began referring to him as "Braid Head", unaware that she was embarrassed to refer to him as her elder brother. Disturbed by her animosity, Nahyuta decided to consult Apollo on the matter.
- Phoenix met up with an unseen Thalassa Gramarye, presenting her the photo of her former-husband Jove Justice, Apollo's deceased biological father . He suggested to her that they tell Apollo and Trucy the truth behind their shared parentage, now they had grown into capable adults in their own right, and she agreed.
Months later, Apollo wrote to Phoenix to give him a status update. He apologized for not writing sooner due to being swamped with work, reforming a legal system he'd only started to grasp.
In Khura'in, Apollo found that he has become sloppy in his work, owing to having taken on too many cases. In addition, Nahyuta, the Judge and Rayfa have been advertising his services as he remains the only defense lawyer in Khura'in, giving him a backlog of several hundred cases. Backed into a corner, Apollo responded in the only way he knew how...

Bad endings
There are four points in the game where the player may receive a bad end, should the player run out of penalties; once during the civil trial, and three times during the Khura'in murder trial.
- If Justice is unable to prove the treasure is the Founder's Orb during the civil trial, the judge will rule in favor of the plaintiff, permanently ending the hope for revolution in Khura'in and causing Wright and Justice's relationship to never be the same again.
- Should Inga's murder trial end after Dhurke is found dead, but before Amara or Nahyuta confess to the murder, Justice will muse that they never got the truth out of Amara, Dhurke was found guilty for the case twenty-three years ago, and the truth was lost.
- If the trial ends after Amara confesses, but before Ga'ran is implicated for the murder, she is arrested and tried for his murder, while Dhurke was found guilty for the case twenty-three years ago, and the truth was lost.
- If Justice fails at proving Ga'ran's guilt, the allegations against her are dismissed. Dhurke is proven innocent for Inga's murder, but the truth behind his death and the case twenty-three years ago remains unsolved. Justice is forced underground to escape the queen's agents, and joins the Defiant Dragons, hoping to one day bring revolution to the country.
References to other cases
- While in the caves, Apollo Justice tells Dhurke about some of his previous court experiences, such as events from Turnabout Trump and Turnabout Corner, as well as meeting prosecutors Klavier Gavin and Simon Blackquill (the latter meeting occurring in The Monstrous Turnabout).
- When in Archie Buff's study, the Sacred Urn seen in Reunion, and Turnabout and The Stolen Turnabout can be seen next to a statue of Ami Fey holding a Shichishito similar to that of Bridge to the Turnabout. The scroll depicting Misty Fey also makes an appearance; humorously, Buff's restoration seemingly included the gravy which Pearl vandalized the scroll with.
- When examining the computer in Archie Buff's home, the letters BSI appear. This may be a reference to the company Blue Screens Inc from Recipe for Turnabout.
- Prior to the civil trial, Cykes asks Justice what case they're taking on today. She asks him if it's a locked-room mystery, a suspect with a flimsy alibi, or a dying message. This could all be a reference to her own case in the game, Turnabout Storyteller, as the case involves all three.
- When Paul Atishon claims to have seen Datz Are'bal hit Archie Buff at his desk, Apollo points out that since there was a bookcase in between the desk and the window, the only way Atishon could have seen the murder was from inside the room. This is almost the exact same argument Wright used against Redd White in Turnabout Sisters. Possibly coincidentally, both witnesses turned out to be the true culprits of each case (White murdered Mia Fey, and Atishon murdered Buff).
- While investigating Amara's tomb, Apollo and Athena talk about Inga's grape juice, and mention Phoenix's consumption of it. Athena wonders if it was the "fermented kind," but Apollo states that Phoenix was in the hospital during that time, referencing the events of Turnabout Corner.
- Despite proving himself innocent of the attempt on Amara's life, Dhurke is explained to have been found guilty due to allegedly forging evidence. Edgeworth, none too subtly, reminds Wright of the events that led to his disbarment as seen in Turnabout Succession.
- While Edgeworth and Phoenix talk to Queen Ga'ran about not needing defense lawyers, she mentions that a lack of lawyers doesn't matter as long as prosecutors run perfect trials. Phoenix thinks to himself, "Perfect prosecutors and their perfect trials, huh..." to which Edgeworth objects, "Let's not get started down THIS path..." This references to the first Ace Attorney game, where Edgeworth cared only about his perfect record, having followed the philosophy of perfection from his mentor Manfred von Karma. Edgeworth's comeback alludes to his rejection of said philosophy over the course of his character development, as explored in subsequent games, namely Ace Attorney: Justice For All and Ace Attorney Investigations.
- When presenting unrelated evidence to Edgeworth while investigating in Khura'in, Phoenix mentions how he heard from his sources about the investigations that Edgeworth had been involved in, referencing to the cases in Ace Attorney Investigations and Gyakuten Kenji 2. As a recurring joke, Edgeworth then mentions looking forward to Phoenix's source's next salary evaluation.
- When presenting Inga's autopsy report to Edgeworth, he claims that it is ironic that a man tasked with upholding the law ended up breaking it. Phoenix then comments that that has happened a number of times back in the U.S. as well to which Edgeworth claims that the worst offenders have been put away.
- When investigating the late Inga's room, a bottle of jet-black "Je Suis L'Belle!" hair dye can be found on his desk, a reference to Florent L'Belle's brand of cosmetics mentioned in The Monstrous Turnabout. While not explicitly mentioned, it is hinted that Amara used the dye whenever she needed to masquerade as Ga'ran to perform spirit channelings, and later, to channel Inga and Dhurke, by dyeing her white hair black.
- At one point Maya calls herself an "Ace Spirit Medium." This nickname was first used in The Stolen Turnabout.
- If Apollo answers that Amara had been hiding in the sarcophagus when asked how she managed to disappear from the scene of the crime, he suggests that she might have been able to exit it through a trapdoor at the bottom, adding that he has seen that happen during a magic show in the United States. This is a reference to the manner in which Trucy escaped from the coffin prop in The Magical Turnabout.
- Apollo's final pointed-finger pose causing a windstorm that knocks down the guards is a nod to the anime adaptation of the series, where this action is frequently seen as a visual equivalent to the games' use of speed lines that appear behind a character emphasizing the end of their argument.
References to popular culture
- The Yashichi, a recurring pinwheel-like symbol in many Capcom games, can be seen as a desktop icon by examining the E-Mail piece of evidence.
- Upon examining the statue in Archie Buff's study, the Statue will shout out "EX-TER-MI-NATE. EX-TER-MI-NATE. DES-TROY ALL TAR-GETS/HU-MANS." This is referring to the well known quote of the Daleks from Doctor Who.
- Upon examining the Statue with Armie present, she will state that the statue is an alien weapon that destroyed an entire ancient civilization. This is reference to the planet Gallifrey from Doctor Who; the entire planet was originally thought to have been destroyed by a weapon known as "The Moment".
- When examining the bird/plane-like figure in Archie's study, it leads to Apollo and Dhurke having a ladder vs. stepladder-like conversation, where they question whether it's a bird or a plane. This is a reference to the saying "It's a bird, it's a plane, no it's Superman!" from the Superman comics.
- During the civil trial, Paul Atishon makes several comments referencing several United States' presidents
- When he first shows up in court and begins making his pitch, he uses the line, "Ask not what you can do for your country," a nod to President John F. Kennedy's inaugural address.
- Prior to his breakdown, he says "I-I... I am not a crook." This is a reference to a quote said by another corrupt politician and former US president Richard Nixon in a speech of his concerning "The Watergate Scandal".
- While accessing Buff's computer, Sarge says that "a modern day warrior must be well-versed in technology... and have mean, mean pride!" This is likely a nod to the song "Tom Sawyer" by the Canadian rock band Rush and its opening line"A modern day warrior // Mean, mean stride // Today's Tom Sawyer // Mean, mean pride".
- When Apollo questions Pearl about why Archie Buff was at the bus stop, she lies and says that rain spirits were at the bus stop. This could be a reference to the bus stop scene in My Neighbor Totoro, where Totoro was waiting for Catbus to arrive.
- After Ema reveals that Buff has stolen many of the artifacts he was researching, she claims that he was a "classic treasure hunter," to which Athena ponders whether or not Buff had "thrilling adventures in exotic places, risking life and limb for glory." Apollo then states that it was unlikely that Buff was the star of his own movie series. This is a nod to the Indiana Jones movie series.
- If Apollo presents incorrect evidence during the civil trial, one of the responses will include Phoenix mentioning how a gambler once sang, "you got to know when to hold 'em, know when to fold 'em," and The Judge will chime in to say he likes that song, finishing the chorus. This is a reference to, "The Gambler," a song sung by Kenny Rogers.
- When pressing Paul Atishon's statements, at one point Apollo will describe him as, "a platform of sound and fury, signifying nothing." This is a nod to Shakespeare's play, MacBeth.
- Upon starting a therapy session with Cykes, Sarge mentions how there is no room for women on the battlefield. Cykes retorts with "This G.I. Jane's always ready for a fight in the courtroom!" alluding to the 1997 movie G.I. Jane, a fictional movie about the first woman to train in a specific US Navy unit.
- When Armie Buff is about to stand for the first time, she states, "This is one small step for man... and one giant leap for me!" This is reference to Neil Armstrong's words when he first stepped on the the moon.
- While discussing the reason for Inga's button being in the ash, Apollo will tell Athena that "Every puzzle has an answer," after hearing Ema's explanation. This is a line often used throughout the Professor Layton series, usually after solving a puzzle.
- After Ga'ran changes into her prosecutor outfit, a shocked Wright and Justice exclaim that she underwent an "extreme makeover". This may be a reference to an infamous line uttered by a newly-mutated Ricardo Irving before his boss battle in Resident Evil 5, another Capcom game.
Typos and errors
- Before Sarge opened the computer, she said: "Ha ha ha ha ha! Leave it me!" when it should be "Ha ha ha ha ha! Leave it to me!"
- During Ur'gaid's flashback to when Are'bal exploded firecrackers in the bazaar, the textbox will sometimes erronously say "Datz" even though it is Ur'gaid who's talking.
- When the judge questions Amara's survival, he says, "Her Eminence Queen Amara yet lives...", though this is Ga'ran's title.
- When Ga'ran is being accused of the murder, she says "You khave no evidence"
Name
- Japanese - 逆転の大革命 (Gyakuten no Dai Kakumei lit. "Turnabout Revolution")
